


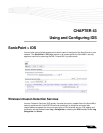


SonicPoint > Virtual Access Point
551
SonicOS 5.8.1 Administrator Guide
Deployment Restrictions
When configuring your VAP setup, be aware of the following deployment restrictions:
• Maximum SonicPoint restrictions apply and differ based on your SonicWALL security
appliance. Review these restrictions in the “Custom VLAN Settings” section on page 557.
SonicPoint Virtual AP Configuration Task List
A SonicPoint VAP deployment requires several steps to configure. The following section
provides first a brief overview of the steps involved, and then a more in-depth examination of
the parts that make up a successful VAP deployment. This subsequent sections describe VAP
deployment requirements and provides an administrator configuration task list:
• “SonicPoint VAP Configuration Overview” section on page 551
• “Network Zones” section on page 552
• “VLAN Subinterfaces” section on page 557
• “DHCP Server Scope” section on page 558
• “Sonic Point Provisioning Profiles” section on page 562
• “Thinking Critically About VAPs” section on page 562
• “Deploying VAPs to a SonicPoint” section on page 577
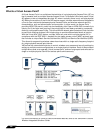
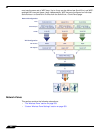
SonicPoint VAP Configuration Overview
The following are required areas of configuration for VAP deployment:
Step 1 Zone - The zone is the backbone of your VAP configuration. Each zone you create will have its
own security and access control settings and you can create and apply multiple zones to a
single physical interface by way of VLAN subinterfaces.
Step 2 Interface (or VLAN Subinterface) - The Interface (X2, X3, etc...) represents the physical
connection between your SonicWALL UTM appliance and your SonicPoint(s). Your individual
zone settings are applied to these interfaces and then forwarded to your SonicPoints.
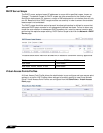
Step 3 DHCP Server - The DHCP server assigns leased IP addresses to users within specified
ranges, known as “Scopes”. The default ranges for DHCP scopes are often excessive for the
needs of most SonicPoint deployments, for instance, a scope of 200 addresses for an interface
that will only use 30. Because of this, DHCP ranges must be set carefully in order to ensure the
available lease scope is not exhausted.
Step 4 VAP Profile - The VAP Profile feature allows for creation of SonicPoint configuration profiles
which can be easily applied to new SonicPoint Virtual Access Points as needed.
Step 5 VAP Objects - The VAP Objects feature allows for setup of general VAP settings. SSID and
VLAN ID are configured through VAP Settings.
Step 6 VAP Groups - The VAP Group feature allows for grouping of multiple VAP objects to be
simultaneously applied to your SonicPoint(s).
Step 7 Assign VAP Group to SonicPoint Provisioning Profile Radio- The Provisioning Profile
allows a VAP Group to be applied to new SonicPoints as they are provisioned.
Step 8 Assign WEP Key (for WEP encryption only) - The Assign WEP Key allows for a WEP
Encryption Key to be applied to new SonicPoints as they are provisioned. WEP keys are
configured per-SonicPoint, meaning that any WEP-enabled VAPs assigned to a SonicPoint