


Network > NAT Policies
367
SonicOS 5.8.1 Administrator Guide
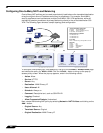
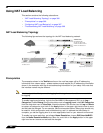
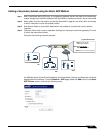
Configuring NAT Load Balancing
To configure NAT load balancing, you must complete the following tasks:
1. Create address objects.
2. Create address group.
3. Create inbound NAT LB Policy.
4. Create outbound NAT LB Policy.
5. Create Firewall Rule.
6. Verify and troubleshoot the network if necessary.
To complete this configuration, perform the following steps:
Step 1 Create Network Objects -- Go to the Network > Address Objects page in the Management
GUI and create the network objects for both of the internal Web servers, and the Virtual IP (VIP)
on which external users will access the servers.
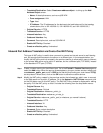
Step 2 Create Address Group -- Now create an address group named www_group and add the two
internal server address objects you just created.
Step 3 Create Inbound NAT Rule for Group -- Now create a NAT rule to allow anyone attempting to
access the VIP to get translated to the address group you just created, using Sticky IP as the
NAT method.
Note Do not save the NAT rule just yet.
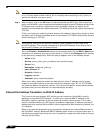
Step 4 Set LB Type and Server Liveliness Method -- On the Advanced tab of the NAT policy
configuration control, you can specify that the object (or group of objects, or group of groups)
be monitored via ICMP ping or by checking for TCP sockets opened. For this example, we are
going to check to see if the server is up and responding by monitoring TCP port 80 (which is
good, since that is what people are trying to access). You can now click on the OK button to
save and activate the changes.
Note Before you go any further, check the logs and the status page to see if the resources have
been detected and have been logged as online. Two alerts will appear as Firewall Events
with the message “Network Monitor: Host 192.160.200.220 is online” (with your IP
addresses). If you do not see these two messages below, check the steps above.
Step 5 Create Outbound NAT Rule for LB Group -- Write a NAT rule to allow the internal servers to
get translated to the VIP when accessing resources out the WAN interface (by default, the X1
interface).
Step 6 Create Firewall Rule for VIP -- Write a firewall rule to allow traffic from the outside to access
the internal Web servers via the VIP.
Step 7 Test Your Work – From a laptop outside the WAN, connect via HTTP to the VIP using a Web
browser.
Note If you wish to load balance one or more SSL VPN Appliances, repeat steps 1-7, using
HTTPS instead as the allowed service.