


3Ć89
Maintaining the System
12. Verify biosensor performance by completing two successful two-point
calibrations.
13. Analyze a minimum of two levels of quality control material to verify sensor
performance.
Reinstalling a Sensor
Use this procedure to reinstall the reference sensor after completing any of the
following procedures:
S Filling the Reference Sensor, page 3-69.
S Replacing the Reference Sensor, page 3-71.
S Replacing the Reference Sensor Cassette, page 3-74.
S Replacing the Internal Reference Electrode, page 3-77.
S Filling the Measurement Sensors, page 3-80.
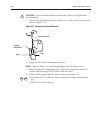
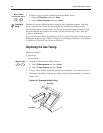
1. Tap the front face of the sensor with your knuckle to release any bubbles.
2. Wipe any excess fill solution from the exterior of the sensor with a lint-free
tissue. On the reference sensor ensure that the vent hole in the reservoir cap is
free of KCl crystals.
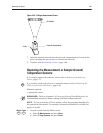
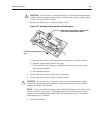
3. Replace any O-ring that is worn or damaged.
4. Verify that the O-rings are in place.
NOTE: The reference sensor has an O-ring on both sides. The measurement
sensors have one O-ring, only on the left side.
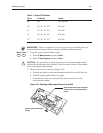
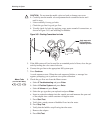
CAUTION: Do not remove or return the sensors to the measurement module
without first discharging static buildup. Touch the inner surface of the module
frame to discharge static buildup.
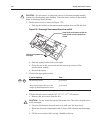
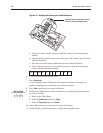
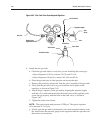
5. Reinstall the sensor:
a. Align the top of the sensor with the sensor contact.
b. Snap the sensor into place.
c. Press the tab on the spring-loaded latch to release the latch.
6. Close the measurement module door.
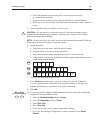
7. Press
Continue.
A wash sequence starts. When the wash sequence finishes, a message box
appears prompting you to perform a two-point calibration.
8. Allow the system to warm up for at least 15 minutes.
9. Press
Yes to perform a two-point calibration.
!