


3Ć85
Maintaining the System
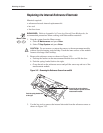
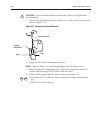
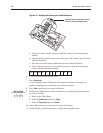
e. Screw the internal electrode into place, ensuring that you do not
cross-thread the electrode.
f. Tap the front face of the sensor with your knuckle to remove bubbles.
g. Wipe any excess fill solution from the exterior of the sensor with a lint-free
tissue.
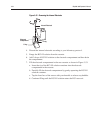
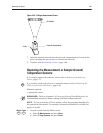
5. Ensure that the O-ring is in place on each sensor.
CAUTION: Do not remove or return the sensors to the measurement module
without first discharging static buildup. Touch the inner surface of the module
frame to discharge static buildup.
NOTE: If the sensor does not easily insert into the measurement module, slide the
remaining sensors to the right to create more space.
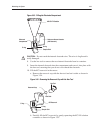
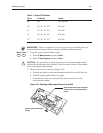
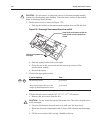
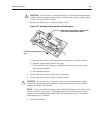
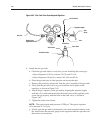
6. Install the sensor:
a. Align the top of the sensor with the sensor contact.
b. Snap the body of the sensor down into place.
c. Press the tab on the spring-loaded latch down to release the latch.
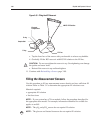
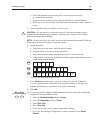
d. Verify that the sensors are installed from left to right in the following order
in the measurement module:
p
O
2
p
CO
2
GRD
p
H Ref
p
O
2
p
CO
2
GRD
p
H
Na
+
K
+
Ca
++
Cl
–
Ref
p
O
2
p
CO
2
GRD
p
H
Na
+
K
+
Ca
++
Cl
–
RefGlu Lac
7. Close the measurement module door.
8. Press
Continue and allow the system to warm up for at least 15 minutes.
A wash sequence starts. When the wash sequence finishes, a message box
appears prompting you to perform a two-point calibration.
9. Press
No.
10. If you replaced the sample ground/temperature sensor, check the sample path
temperature from the Menu screen:
a. Select
3 Troubleshooting and press Enter.
b. Select 2 Temp/pAtm and press Enter.
c. Press
Start Test.
d. Press Stop Test.
e. Check the screen for the sample temperature reading.
f. If you see the message, Temperature control system off, press Reset
Control
.
!
840
850
860
3
Menu Code
2
(from the Main Menu)