


Configuration and Use Manual 113
Measurement Performance
Measurement Performance DefaultsTroubleshootingCompensation
If the zero procedure fails, two recovery functions are provided:
• Restore prior zero, available only from ProLink II and only during the current zero procedure.
Once you have closed the Calibration dialog box or disconnected from the transmitter, you can
no longer restore the prior zero.
• Restore factory zero, available via:
- The display (see Figure C-16)
- ProLink II, in the Calibration dialog box (see Figure C-1)
- A PROFIBUS host with the EDD (see Figure C-7)
- PROFIBUS bus parameters (Calibration block, Index 42; see Table D-3).
If desired, you can use one of these functions to return the meter to operation while you are
troubleshooting the cause of the zero failure (see Section 11.8).
10.5.1 Preparing for zero
To prepare for the zero procedure:
1. Apply power to the flowmeter. Allow the flowmeter to warm up for approximately 20 minutes.
2. Run the process fluid through the sensor until the sensor temperature reaches the normal
process operating temperature.
3. Close the shutoff valve downstream from the sensor.
4. Ensure that the sensor is completely filled with fluid.
5. Ensure that the process flow has completely stopped.
10.5.2 Zero procedure
To zero the flowmeter:
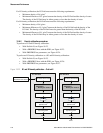
• Using the zero button, see Figure 10-17.
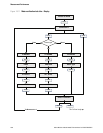
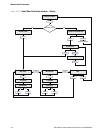
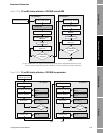
• Using the display menu, see Figure 10-18. For a complete illustration of the display zero
menu, see Figure C-16.
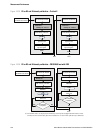
• Using ProLink II, see Figure 10-19.
• Using a PROFIBUS host with the EDD, use the Zero Calibration window in the Device menu.
See Figure C-16.
• Using PROFIBUS bus parameters, see Figure 10-21.
CAUTION
If fluid is flowing through the sensor during zero calibration, the calibration
may be inaccurate, resulting in inaccurate process measurement.
To improve the sensor zero calibration and measurement accuracy, ensure that
process flow through the sensor has completely stopped.