Teledyne API M100E Analyzer Operation Manual EPA Protocol Calibration
203
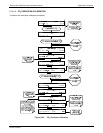
9.4.1. PRECISION CALIBRATION
To perform a precision calibration, the instrument set up; input sources of zero air and sample gas and; procedures
should conform to those described in Section 8.2 for analyzers with no valve options or IZS valve option installed and
Sect
ion 8.5 for analyzers with IZS options installed with the following exception:
9.4.2. PRECISION CHECK
A periodic check is used to assess the data for precision. A one-point precision check must be carried out at least
once every 2 weeks on each analyzer at an SO
2
concentration between 0.08 and 0.10 ppm. The analyzer must be
operated in its normal sampling mode, and the precision test gas must pass through all filters, scrubbers,
conditioners, and other components used during normal ambient sampling. The standards from which precision
check test concentrations are obtained must be traceable to NIST-SRM. Those standards used for calibration or
auditing may be used.
To perform a precision check, the instrument set up; sources of zero air and sample gas and procedures should
conform to those described in Section 8.3 for analyzers with no valve options or IZS valve option installed and
Sec
t
ion 8.6 for analyzers with Z/S or IZS options inst
alled with the following exception:
Connect the analyzer to a precision gas that has an SO
2
concentration between 0.08 and 0.10 ppm. If a
precision check is made in conjunction with a zero/span check, it must be made prior to any zero or span
adjustments.
Record this value. Information from the check procedure is used to assess the precision of the monitoring data;
refer to 40 CFR 58 for procedures for calculating and reporting precision.
9.5. DYNAMIC MULTIPOINT SPAN CALIBRATION
Dynamic calibration involves introducing gas samples of known concentrations to an instrument in order to
record the instruments performance at a predetermined sensitivity and to derive a calibration relationship. A
minimum of three reference points and one zero point uniformly spaced covering 0 to 90 percent of the operating
range are recommended to define this relationship.
The analyzer's recorded response is compared with the known concentration to derive the calibration
relationship.
To perform a precision check, the instrument set up, sources of zero air and sample gas should conform to those
described in Section 8.2.
Follow th
e pro
cedures described in Section 8.2 for calibrating the zero points.
For each
mid point:
04515F DCN6048


