EPA Protocol Calibration Teledyne API M100E Analyzer Operation Manual
198
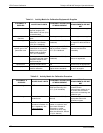
Table 9-1: Activity Matrix for Calibration Equipment & Supplies
EQUIPMENT &
SUPPLIES
ACCEPTANCE LIMITS
FREQUENCY AND METHOD
OF MEASUREMENT
ACTION IF
REQUIREMENTS ARE NOT
MET
Recorder
Compatible with output
signal of analyzer; min.
chart width of 150 mm (6 in)
is recommended
Check upon receipt Return equipment to supplier
Sample line and
manifold
Constructed of PTFE or
glass
Check upon receipt Return equipment to supplier
Calibration equipment
Meets guidelines of
reference 1 and Section
2.3.2 (Q.A. Handbook)
Refer to Section 2.3.9 (Q.A.
Handbook)
Return equipment/ supplies
to supplier or take corrective
action
Working standard SO
2
cylinder gas or SO
2
permeation tube
Traceable to NIST-SRM
meets limits in traceability
protocol for accuracy and
stability (refer to Section
2.0.7, Q.A. Handbook)
Analyzed against NIST-SRM;
refer to protocol in Section
2.0.7, Q.A. Handbook
Obtain new working
standard and check for
traceability
Zero air
Clean dry ambient air, free
of contaminants that cause
detectable response with
the SO
2
analyzer.
Refer to Section 2.9.2 (Q.A.
Handbook)
Obtain air from another
source or regenerate.
Record form Develop standard forms N/A Revise forms as appropriate
Audit equipment
Must not be the same as
used for calibration
System must be checked out
against known standards
Locate problem and correct
or return to supplier
Table 9-2: Activity Matrix for Calibration Procedure
EQUIPMENT &
SUPPLIES
ACCEPTANCE LIMITS
FREQUENCY AND METHOD
OF MEASUREMENT
ACTION IF
REQUIREMENTS ARE NOT
MET
Calibration gases NIST traceable
Assayed against an NIST-
SRM semi-annually, Sec.
2.0.7, (Q.A. Handbook)
Working gas standard is
unstable, and/or
measurement method is out
of control; take corrective
action such as obtaining new
calibration gas.
Dilution gas
Zero air, free of
contaminants
Refer to Section 2.9.2 (Q.A.
Manual)
Return to supplier or take
appropriate action with
generation system
Multi-point calibration
Use calibration
procedure in Subsec. 2.2
(Q.A. Handbook); also
Federal Register
Perform at least once every
quarter or anytime a level
span check indicates a
discrepancy, or after
maintenance which may
affect the calibration; Subsec
2.5 (Q.A. Manual)
Repeat the calibration
04515F DCN6048


