Teledyne API M100E Analyzer Operation Manual EPA Protocol Calibration
201
9.2. LEVEL 1 CALIBRATIONS VERSUS LEVEL 2 CHECKS
Essential to quality assurance are scheduled checks for verifying the operational status of the monitoring system.
The operator should visit the site at least once each week. It is recommended Level 1 zero and span check
conducted on the analyzer every two weeks. Level 2 zero and span checks should be conducted at a frequency
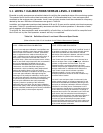
desired by the user. Definitions of these terms are given in Table 9-4.
In addition, a
n indep
endent precision check between 0.08 and 0.10 ppm must be carried out at least once every
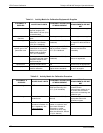
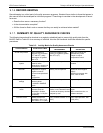
two weeks. Table 9-3 summarizes the quality assurance activities for routin
e operations. A discussion of each
activity appears in the following sections.
To provide for documentation and accountability of activities, a checklist should be compiled and
then filled out by the field operator as each activity is completed.
Table 9-4: Definition of Level 1 and Level 2 Zero and Span Checks
(Refer to Section 2.0.9 of Q.A. Handbook for Air Pollution Measurement Systems)
LEVEL 1 ZERO AND SPAN CALIBRATION
A Level 1 zero and span calibration is a simplified, two-
point analyzer calibration used when analyzer linearity
does not need to be checked or verified. (Sometimes
when no adjustments are made to the analyzer, the
Level 1 calibration may be called a zero/span check, in
which case it must not be confused with a Level 2
zero/span check.) Since most analyzers have a reliably
linear or near-linear output response with concentration,
they can be adequately calibrated with only two
concentration standards (two-point concentration).
Furthermore, one of the standards may be zero
concentration, which is relatively easily obtained and
need not be certified. Hence, only one certified
concentration standard is needed for the two-point (Level
1) zero and span calibration. Although lacking the
advantages of the multipoint calibration, the two-point
zero and span calibration--because of its simplicity--can
be (and should be) carried out much more frequently.
Also, two-point calibrations are easily automated.
Frequency checks or updating of the calibration
relationship with a two-point zero and span calibration
improves the quality of the monitoring data by helping to
keep the calibration relationship more closely matched to
any changes (drifts) in the analyzer response.
LEVEL 2 ZERO AND SPAN CHECK
A Level 2 zero and span check is an "unofficial" check of
an analyzer's response. It may include dynamic checks
made with uncertified test concentrations, artificial
stimulation of the analyzer's detector, electronic or other
types of checks of a portion of the analyzer, etc.
Level 2 zero and span checks are not
to be used as a
basis for analyzer zero or span adjustments, calibration
updates, or adjustment of ambient data. They are
intended as quick, convenient checks to be used
between zero and span calibrations to check for possible
analyzer malfunction or calibration drift. Whenever a
Level 2 zero or span check indicates a possible
calibration problem, a Level 1 zero and span (or
multipoint) calibration should be carried out before any
corrective action is taken.
If a Level 2 zero and span check is to be used in the
quality control program, a "reference response" for the
check should be obtained immediately following a zero
and span (or multipoint) calibration while the analyzer's
calibration is accurately known. Subsequent Level 2
check responses should then be compared to the most
recent reference response to determine if a change in
response has occurred. For automatic Level 2 zero and
span checks, the first scheduled check following the
calibration should be used for the reference response. It
should be kept in mind that any Level 2 check that
involves only part of the analyzer's system cannot
provide information about the portions of the system not
checked and therefore cannot be used as a verification
of the overall analyzer calibration.
04515F DCN6048


