


25 Printing Patient Reports Setting Up Individual Print Jobs
270
Setting Up Individual Print Jobs
To adjust the appearance of individual print jobs, in the Reports menu,
1 Select Main Setup -> Reports -> Setup Reports to enter the Setup Reports menu.
2 Select Report and then select the report you want to set up.
3 Select Report Type and then select the reports template you want the report selected in Step 2
to use. The selection of templates listed depends on the report type selected.
Each template includes patient demographic data, and each Realtime Report also includes alarm
and INOP information. In addition, the templates include:
Visible Waves: all waves currently visible, in the order they appear on the screen.
All Waves: all measured waves,
RT Waves: all currently measured realtime waves, according to the monitor’s priority list.
HiRes Waves: all measured HiRes waves
OxyCRG Waves: the OxyCRG/Neonatal Event Review waves.
Vital Signs: trend information in tabular form.
Graph Trend: trend information in graphic form.
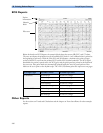
ECG3X4, ECG6X2, ECG12X1, ECG4X2, ECG8X1, ECG12X1(2P): ECG reports.
EEG: EEG reports.
Episode: a single patient event episode.
Review: an overview of patient events
Alarm Limits: a list of all currently set alarm limits.
4 Select Report Size to set choose the paper size to be used for the report: Unspecified to use
the default size for the template chosen,
Universal, A4, Letter, LrgUniversal, A3, or
Ledger. The list of available sizes depends on the connected printers.
5 Select Orientation to set the orientation of the report printout: Unspec. to use the default
size for the template chosen,
Landscape or Portrait.
6 Select Target Device choose which printer the print job will be sent to: Unspec. to use the
default printer, or the printer name defined at the Information Center or in the monitor’s
Configuration Mode (for example, Local 1).
Some settings may be inactive (“grayed-out”) in this menu for reports that can only be started in a
special window.
Checking Printer Settings
The printer settings for your monitor are defined in Configuration Mode. The printer settings Paper
Size
, Resolution, Color Support, and Duplex Option for the active printer are visible but
inactive (“grayed-out”) in the
Setup Printers menu.
Printer names for locally-connected printers can be defined in Configuration Mode. You can see
whether a specified printer is centrally or locally connected in the Setup Printers menu under
Port: Local <name> indicates locally-connected printers, Remote <name> indicates
centrally-connected printers.
♦ To enter the Setup Printers menu, in the Reports menu, select Setup Printers.