


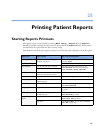


25 Printing Patient Reports Stopping Reports Printouts
268
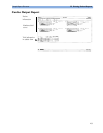
Stopping Reports Printouts
♦ To stop Reports printing, in the Reports menu, select
–
Stop Report to stop the current print job
–
Stop All Reports to cancel all queued report printouts
–
Scheduled Rep. to toggle to Off and switch off scheduled reports.
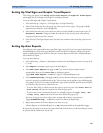
Setting Up Reports
ECG, Vital Signs, Graphic Trends, and Auto Reports settings must be defined in Configuration
Mode. As the content of context-linked reports, such as Cardiac Output, Calculations, and Wedge, is
defined by the content of the procedure window, these reports do not need to be set up.
The content you define in the individual
Setup Reports menus will be used in all reports of this
type: for example, if you set a print speed of 50 mm/sec in the
ECG Reports menu, every ECG report
will be printed at this speed, irrespective of format.
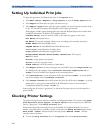
Setting Up ECG Reports
The settings you choose in the ECG Reports menu apply for all ECG reports printed. To set up
ECG Reports,
1 Select Main Setup -> Reports -> ECG Reports. Note the report layout configured for
your monitor, either Internat. or Cabrera. This
setting is inactive (“grayed-out”) in Monitoring Mode
and can only be changed in Configuration Mode.
2
Select ECG Gain and set the required ECG Gain to define how ECG waves will appear on the
ECG report printouts.
3 Select Speed and select the report print speed.
4 Select Annotation and toggle to On if the printed ECG wave should be annotated with beat
labels or not. See the chapter on ECG for a list of beat labels. Pace pulse marks are automatically
printed beside the wave for paced patients.
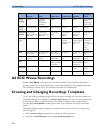
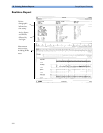
Alarm Limits Report Graphic and numeric report of all
current alarm limits
In the Alarm Limits window, select Print
Limits
Realtime Reports,
including oxyCRG
Reports (Neonatal
Event Review)
patient data and numerics, and either:
all displayed waves OR all measured
waves OR all measured RT waves Or all
measured HiRes waves, OR oxyCRG
waves (RT waves: ECG Primary lead,
Pleth, Resp; HiRes waves: btbHR, HiRes
SpO
2
, HiRes Resp)
Select the Realtime Reports SmartKey, if
configured
Loops Report Individual Loops diagram with
timestamp, currently measured numerics
In the Loops window, select Print Loop
Battery Report Battery serial numbers, information on
the currently-measured and potential
charge status of the battery or batteries
In the Battery Status window, select Print
Status.
Report types Report contents How to start printing reports