


SECTION 7—BACK ADJUSTMENTS
Part No 1114842 85 2G Tarsys®Powered Seating System
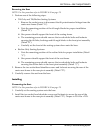
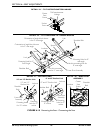
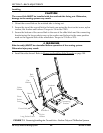
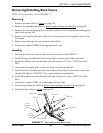
Removing/Installing Back Pan
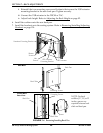
NOTE: For this procedure, refer to FIGURE 7.4 on page 86.
Removing
1. Remove the headrest from the seating system. Refer to
Removing/Installing/Adjusting Headrest on page 124.
2. Lift up on the fastening straps and remove the cushion from the existing back pan.
3. Perform one of the following:
• Tilt-Only Systems - Proceed to STEP 4.
• Tilt/Recline and Recline-Only Systems:
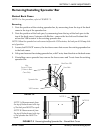
i. Disconnect the VSR actuator cable from the TRCM or TAC.
ii. Remove the two mounting screws and locknuts that secure the VSR actuator
mounting bracket to the existing back pan.
4. Remove the two mounting screws that secure the headrest mounting bracket to the
existing back pan.
5. Remove headrest bracket from the existing back pan.
NOTE: For 17, 19, and 21-inch width backs, spacers are required for proper installation.
6. Remove the four mounting screws and spacers (if applicable) that secure the existing
back pan to the two back slides.
7. Remove existing back pan from the two back slides.
Installing
1. Line up the mounting holes in the new/existing back pan with the two new/existing
back slides.
NOTE: For 17, 19, and 21-inch width profile backs, spacers are required for proper installation.
2. Install the four mounting screws and spacers (if applicable) that secure the
new/existing back pan to the two new/existing back slides. Tighten securely.
3. Position the headrest bracket on the new/existing back pan.
4. Install the two mounting screws and locknuts that secure the headrest bracket to the
new/existing back pan. Tighten securely.
5. Perform one of the following:
• Tilt-Only Systems - Proceed to STEP 6.
• Tilt/Recline and Recline-Only Systems:
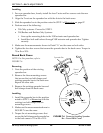
i. Reposition the mounting holes in the VSR actuator bracket with the mounting
holes in the new back pan.