


SECTION 14—ELECTRONICS
2G Tarsys®Powered Seating System 142 Part No 1114842
2. Remove the two short hex screws, washers and coved washers securing the upper
bracket to the back cane.
3. Remove the controller bracket with TAC/TRCM from the back cane.
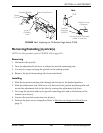
Extruded Canes
1. Loosen the four hex screws that secure the spreader bar to the back canes.
2. Loosen the two hex screws and washers that secure the controller bracket to the T-nuts
and back cane.
3. Remove the T-nuts.
4. Remove the controller bracket with TAC/TRCM from the back cane.
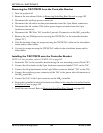
Installing the TAC/TRCM Controller Bracket
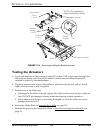
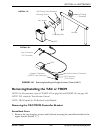
Securing the Controller Bracket to the Back Cane
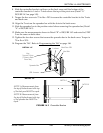
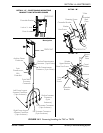
NOTE: For this procedure, refer to FIGURE 14.2 on page 143 and FIGURE 14.3 on page 145.
Round Back Canes
1. If necessary, install the TAC/TRCM onto the controller bracket. Refer to Installing the
TAC/TRCM onto the Controller Bracket on page 144.
2. If necessary, install the two short hex screws, washers and coved washers to secure the
upper bracket to the back cane (Detail “C”). Torque the hex screws to 75 in-lbs ± 20%.
3. Install the two long hex screws and locknuts to secure the controller bracket to the
upper bracket.
4. Program the TAC. Refer to Refer to Programming the TAC on page 146.
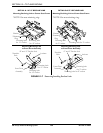
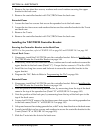
Extruded Canes
1. If necessary, install the TAC/TRCM onto the controller bracket. Refer to Installing the
TAC/TRCM onto the Controller Bracket on page 144.
2. Note the position of the existing spreader bar, by measuring from the top of the back
canes to the top of the spreader bar (Detail “B” of FIGURE 14.2 on page 143).
3. Note the position of the back pan, by measuring from the top of the back pan to the
top of the back canes.
4. Loosen, but DO NOT remove, the four hex screws that secure the existing spreader bar
to the back canes (Detail “A” of FIGURE 14.2 on page 143).
5. Lift up and remove the existing spreader bar, with T-nuts, from the slots on the back canes.
6. Loosely install the two hex screws and washers to secure the controller bracket to the
T-nuts (Detail “B” of FIGURE 14.3 on page 145).
7. Slide the T-nuts into the slots in the back cane.