


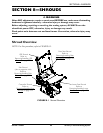


SECTION 8—SHROUDS
2G Tarsys®Powered Seating System 102 Part No 1114842
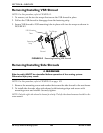
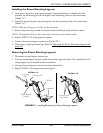
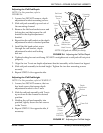
Removing/Installing Rear Shroud
NOTE: For this procedure, refer to FIGURE 8.5.
1. Verify the joystick On/Off switch is in the Off position.
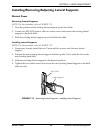
2. Remove the two thumb screws that secure the rear shroud to the wheelchair.
3. Remove the rear shroud from the wheelchair.
FIGURE 8.5 Removing/Installing Rear Shroud
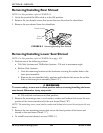
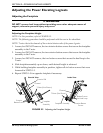
Removing/Installing Lower Seat Shroud
NOTE: For this procedure, refer to FIGURE 8.6 on page 103.
1. Perform one of the following actions:
• Tilt-Only Systems and Tilt/Recline Systems - Tilt seat to maximum angle.
• Recline-Only Systems:
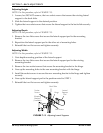
i. Note the mounting location of the hardware securing the recline links to the
front pivot assembly.
ii. Remove the two shoulder bolts, washers and locknuts that secure the recline
links to the front pivot assembly (Detail “A”).
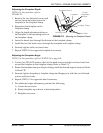
ƽ WARNING
To ensure safety, secure seat in tilted position before removing/installing the lower
seat shroud. Otherwise, injury may result.
iii. Tilt seat back and secure in tilted position.
2. Remove the mounting screw, coved washer, washer and locknut that secure the rear
portion of the lower seat shroud to the seat frame (Detail “B”).
NOTE: The mounting screw, coved washer, washer and locknut also secure the seat pan to the seat
frame.
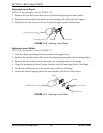
3. Remove the two mounting screws that secure the front portion of the lower seat
shroud to the seat frame (Detail “C”).
4. To install lower seat shroud, reverse STEPS 1-3.
Thumb Screws
Rear
Shroud