


SECTION 13—TILT AND RECLINE
Part No 1114842 137 2G Tarsys®Powered Seating System
Removing/Installing Tilt Links
ƽ WARNING
Remove the existing tilt link and install the new tilt link on one side of the
wheelchair at a time. Otherwise, injury or damage may occur.
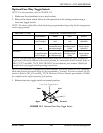
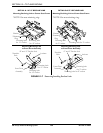
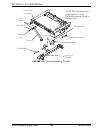
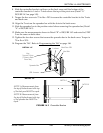
NOTE: For this procedure, refer to FIGURE 13.8 on page 138.
Removing
1. Note the orientation of the tilt angle blocks for proper reinstallation.
2. Remove the locknut, bushing and shoulder bolt securing the tilt link to the front pivot
assembly.
3. Remove the retaining ring securing the flat washer, two nylon washers and the tilt link
to the center seat frame pin.
4. Remove the tilt link from the center seat frame pin.
Installing
1. Position one nylon washer, tilt link, one nylon washer, and flat washer onto the center
seat frame pin.
CAUTION
Be sure to use a new retaining ring that is not bent or damaged.
2. Secure the flat washer, two nylon washers and the tilt link to the center seat frame pin
using a new retaining ring.
3. Verify that the retaining ring is fully seated in the groove in the pin.
4. Install the shoulder bolt through the front pivot assembly, tilt link, front pivot
assembly, bushing and tilt angle block.
NOTE: The tilt angle block should be oriented as noted in STEP 1 of Removing
on page 137. If
unsure of the orientation, refer to Adjusting Seat Angle on page 61.
5. Secure the tilt link, tilt angle block and bushing to the front pivot assembly using the
locknut. Torque to 23 ft-lbs ± 20%.
6. Perform the post-service inspection. Refer to Post-Service Inspection Checklist
on
page 21.