


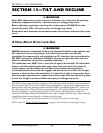


SECTION 13—TILT AND RECLINE
Part No 1114842 131 2G Tarsys®Powered Seating System
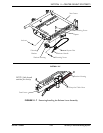
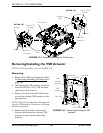
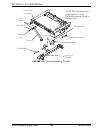
Removing/Installing the Tilt Actuator
NOTE: For this procedure, refer to FIGURE 13.4 on page 132.
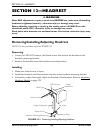
Removing
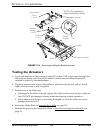
1. Tilt the seat back until the front of the actuator is visible.
2. Turn the wheelchair power OFF.
3. Remove the rear shroud. Refer to Removing/Installing Rear Shroud on page 102.
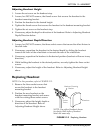
4. Disconnect the existing tilt actuator connector from the TRCM tilt actuator connector.
5. Remove the shoulder bolt, two spacers and locknut that secure the rear of the existing
actuator to the rear pivot assembly.
ƽ WARNING
Hold the seat frame while removing the front actuator hardware, otherwise injury
may occur.
6. While holding the seat frame, remove the shoulder bolt and locknut that secure the
existing actuator to the front pivot assembly.
7. Remove the existing actuator from the rear pivot assembly.
Installing
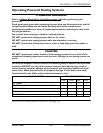
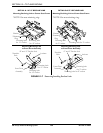
1. Position the tilt actuator on the rear pivot assembly as shown in FIGURE 13.4.
2. Line up the mounting holes in the rear of the actuator and the rear pivot assembly.
3. Install the shoulder bolt, two spacers and locknut that secure the rear of the actuator
to the rear pivot assembly. Securely tighten. Torque to 13 ft-lbs ± 20%. Refer to
FIGURE 13.4 for correct hardware orientation.
4. Line up the mounting holes in the front of the actuator and the front pivot assembly.
5. Install the shoulder bolt and locknut that secure the front of the actuator to the front
pivot assembly. Securely tighten. Torque to 13 ft-lbs ± 20%. Refer to FIGURE 13.4 for
correct hardware orientation.
6. Connect the tilt actuator connector to the TRCM tilt actuator connector.
7. Reinstall the rear shroud. Refer to Removing/Installing Rear Shroud on page 102.
8. Perform the post-service inspection. Refer to Post-Service Inspection Checklist
on
page 21.