


28 Micro Motion
®
Model 2200S Transmitters
Getting Ready to Configure
3.5 Configuration tips and tricks
This section provides information that may be useful before and during configuration.
3.5.1 Write-protection
Before beginning configuration, you may need to disable write-protection. To do this:
• Using ProLink II, click
ProLink > Configuration > Device, then ensure that the
write-protection option is disabled.
• Using the Communicator, select
Diag/Service > Perform Diagnostic Action >
Disable Write Protect
.
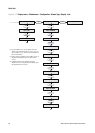
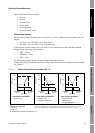
• Using the display:
a. Enter the display menu system.
b. Enter the off-line maintenance menu.
c. Select the Config menu and scroll to
Lock.
d. Ensure that the Lock option is disabled.
For more details on the display menu sequence, see Figures 2-13 and 2-14.
3.5.2 Default values and ranges
Default values and ranges for the most commonly used parameters are provided in Appendix A.
3.5.3 Restoring factory configuration
If you are using ProLink II or the Communicator, you can restore the factory configuration to return
to a known state. To do this:
• Using ProLink II, click
ProLink > Configuration > Device, then click
Restore Factory Configuration.
• Using the Communicator, select
Diag/Service > Perform Diagnostic Action >
Restore Factory Configuration
.
All configuration parameters will be rewritten.
Note: This action is not available from the display.
Example
When you connect a digital multimeter (DMM) to the I/O wiring, it reads
13.5 mA. At the mA receiving device, you see a value of 7.2 mA. You
don’t know if you have an adapter-barrier or if respanning is
implemented in the DCS. Is there a problem?
1. Convert 13.5 mA to the corresponding value on the 4–20 mA scale:
2. Compare and interpret the results: 7 vs. 7.2.
In this case, you probably do not have a configuration or wiring problem
but you may want to perform an mA output trim.
X 13.5 10–()2×=
X7=