


Instruction Bulletin
Appendix A Rev. 3.9
May 2005
Rosemount Analytical Inc. A Division of Emerson Process Management Appendices A-19
World Class 3000
Damage to the diffusion element may be-
come apparent during calibration. Compare
probe response with previous response. A
broken diffusion element will cause a slower
response to calibration gas.
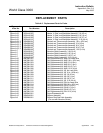
Hex wrenches needed to remove setscrews
and socket head screws in the following pro-
cedure are available as part of a special tool
kit, Table A-3.
Wear heat resistant gloves and cloth-
ing to remove probe from stack. Nor-
mal operating temperatures of diffusor
and vee deflector are approximately
600° to 800°F (300° to 425°C). They can
cause severe burns.
Disconnect and lock out power before
working on any electrical component.
There is voltage up to 115 Vac.
It is not necessary to remove the cell
unless it is certain that replacement is
necessary. Cell cannot be removed for
inspection without damaging it. Refer
to paragraph A-11, Cell Replacement.
b. Replacement Procedure
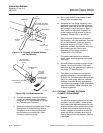
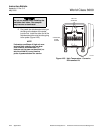
1. Shut off power to electronics. Discon-
nect cable conductors and remove ca-
ble, Figure A-18. Shut off and
disconnect reference air and calibration
gas supplies from probe junction box.
Wearing heat resistant gloves and
clothing, carefully remove probe as-
sembly from stack and allow to cool to
room temperature. Do not attempt to
work on unit until it has cooled to a
comfortable working temperature.
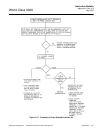
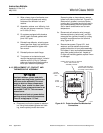
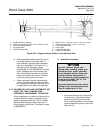
2. Loosen setscrews, Figure A-19, using
hex wrench from special tools kit,
Table A-3, and remove vee deflector.
Inspect setscrews. If damaged, replace
with M-6 x 6 stainless setscrews
coated with anti-seize compound.
3. On systems equipped with abrasive
shield, remove dual dust seal gaskets.
4. Use spanner wrenches from special
tools kit, Table A-3, to turn hub free
from retainer.
5. Put hub in vise. Break out old diffusion
element with chisel along cement line
and 3/8 inch (9.5 mm) pin punch
through cement port.
6. Break out remaining diffusion element
by tapping lightly around hub with
hammer. Clean grooves with pointed
tool if necessary.
7. Replace diffusion element, using re-
placement kit listed in Table A-3. This
consists of a diffusion element, ce-
ment, setscrews, anti-seize compound
and instructions.
8. Test fit replacement element to be sure
seat is clean.
Do not get cement on diffusion ele-
ment except where it touches the hub.
Any cement on ceramic element
blocks airflow through element. Wip-
ing wet cement off of ceramic only
forces cement into pores.
9. Thoroughly mix cement and insert tip
of squeeze bottle into cement port. Tilt
bottle and squeeze while simultane-
ously turning diffusion element into
seat. Do not get any cement on upper
part of diffusion element. Ensure com-
plete penetration of cement around
three grooves in hub. Cement should
extrude from opposite hole. Wipe ex-
cess material back into holes and wipe
top fillet of cement to form a uniform
fillet. (A Q-Tip is useful for this.) Clean
any excess cement from hub with
water.
10. Allow filter to dry at room temperature
overnight or 1 to 2 hours at 200°F
(93°C).