


Part No. 1104849 49 3G Storm Series
®
Wheelchairs
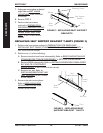
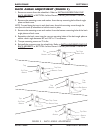
NOTE: Before removing seat mounting plates, note the position of the washers.
4. Remove the seat support brackets. Refer to
REPLACING SEAT SUPPORT BRACKETS
in this section of the manual.
5. Remove the seat stop screw that is closest to the end cap. Refer to
REMOVING/
INSTALLING SEAT STOP SCREWS in this section of the manual.
6. Remove the end cap and channel cover.
7. Slide existing T-Nut(s) out of channel.
8. Insert NEW T-Nut(s) into channel in correct orientation.
9. Replace channel cover and end cap.
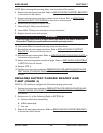
WARNING
The seat stop screws must be in place before operation of your power wheelchair.
Ensure the T-Nut(s) are positioned between both seat stop screws.
10. Use Loctite 242
and reinstall seat stop screw into base frame.
11. Reinstall the seat seat support brackets. Refer to REPLACING SEAT SUPPORT
BRACKETS in this section of the manual.
12. Reinstall the seat mount plates. Refer to REPLACING SEAT MOUNTING PLATES in
this section of the manual.
13. Adjust seat mounting plates to desired angle. Refer to SEAT ANGLE ADJUSTMENT
in SECTION 6 of this manual.
14. Reverse STEP 2.
15. Perform the instructions outlined in PREPARATION FOR REMOVING/INSTALLING
SEAT FRAME (STANDARD FRAME, ASBA, AND VAN SEAT) in SECTION 6 of this
manual.
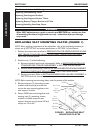
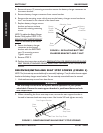
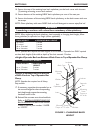
REPLACING BATTERY CHARGER BRACKET AND
T-NUT (FIGURE 4)
NOTE: For 3G wheelchairs equipped with 2G powered seating systems only.
1. Perform the instructions outlined in PREPARATION FOR REMOVING/INSTALLING
THE SEAT FRAME (STANDARD FRAME, ASBA, AND VAN SEAT) in SECTION 6 of
this manual.
2. Remove one (1) of the following (Refer to SECTION 6):
A. Standard seat frame subassembly.
B. ASBA subassembly.
C. Van seat.
3. Remove the seat support brackets. Refer to REPLACING SEAT SUPPORT BRACKETS
in this section of this manual.
BASE FRAME SECTION 7
BASE FRAME