


Part No. 1104849 109 3G Storm Series
®
Wheelchairs
RECLINER
This Section Includes the Following:
Positioning Limit Switch
Adjusting Limit Switch
Replacing Recliner Cable Assemblies
Replacing/Adjusting Gas Cylinders
Changing Back Height
Changing Seat Depth
Changing Seat Width
Installing/Replacing Adjustable 16 to 19-inch Deep Recliner
Seat Frame onto Arrow or X Base
WARNING
After ANY adjustments, repair or service and BEFORE use, make sure
that all attaching hardware is tightened securely - otherwise injury or
damage may result.
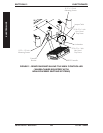
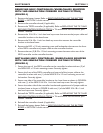
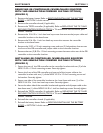
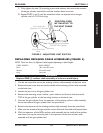
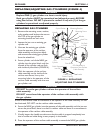
POSITIONING LIMIT SWITCH (FIGURE 1)
NOTE: The battery charger connector, as well as, the limit switch are factory set on the RIGHT
side of the wheelchair. However, they can be positioned on either side for user convenience.
The limit switch MUST BE positioned on the same side as the battery charger connector.
1. Cut the two (2) tie wraps that secure the limit switch wire to the seat frame.
2. Remove the two (2) mounting screws and washers that secure the actuator to the
gas cylinder pivot block.
3. Position actuator on opposite gas cylinder pivot block.
CAUTION
DO NOT over tighten the mounting screws that secure the actuator to
the pivot block. Damage to actuator will occur.
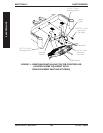
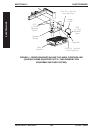
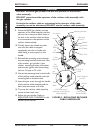
4. Secure the actuator to the pivot block with the two (2) mounting screws and washers.
DO NOT overtighten.
5. Remove the mounting screw that secures the wire retainer to the inside of the seat frame.
6. Remove the two (2) mounting screws and washers that secure the limit switch
sensor to the seat frame.
7. Turn limit switch sensor over so opposite side is facing up and the wire is on the
INSIDE of the seat frame.
8. Position the limit switch sensor onto the opposite side of the seat frame.
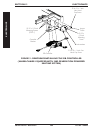
CAUTION
DO NOT over tighten the mounting screws that secure the limit switch
sensor to the seat frame. Damage to the limit switch sensor will occur.
SECTION 14RECLINER