


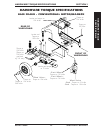

Part No. 1104849 31 3G Storm Series
®
Wheelchairs
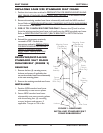
REPLACING SAME SIZE STANDARD SEAT FRAME
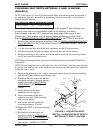
1. Perform the instructions outlined in PREPARATION FOR REMOVING/INSTALLING
SEAT FRAME (STANDARD FRAME, ASBA, AND VAN SEAT) in this section of the
manual.
2. Remove the existing standard seat frame subassembly and install the NEW standard
frame. Refer to REMOVING/INSTALLING STANDARD SEAT FRAME SUBASSEMBLY
in this section of the manual.
3. FOR 12 TO 15-INCH SEAT DEPTHS ONLY: Remove the CJ back brackets
from the existing standard seat frame and install onto the NEW standard seat frame.
Refer to REMOVING/INSTALLING CJ BACK BRACKETS in SECTION 8 of this
manual.
4. Reinstall the components previously
removed in STEP 1. Perform the
instructions outlined in PREPARATION
FOR REMOVING/INSTALLING SEAT
FRAME (STANDARD FRAME,
ADJUSTABLE FRAME, AND VAN
SEAT) in this section of the manual.
REMOVING/INSTALLING
STANDARD SEAT FRAME
SUBASSEMBLY (FIGURE 2)
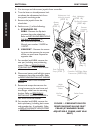
REMOVING
1. Remove the four (4) mounting screws,
locknuts and spacers, if applicable, that
secure the standard seat frame subassembly
to the seat mounting plates.
2. Remove the existing standard seat frame.
INSTALLING
1. Position NEW standard seat frame
subassembly on seat mount plates.
2. Secure NEW standard seat frame
subassembly onto seat mounting plates
with the existing four (4) mounting
screws, locknuts and spacers, if
applicable. Torque to 156 in-lbs.
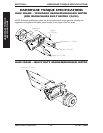
SEAT FRAME SECTION 6
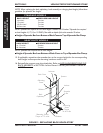
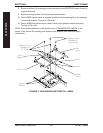
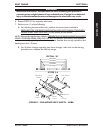
FIGURE 2 - REMOVING/
INSTALLING STANDARD SEAT
FRAME SUBASSEMBLY
Mounting Screws
(Torque to
156 in-lbs)
Standard
Seat
Assembly
Locknuts
Base Frame
Spacer
(16-inch
Wide Only)
Seat
Mounting
Plate
Spacer
(16-inch
Wide Only)
Mounting Screws
(Torque to
156 in-lbs)
SEAT FRAME