3G Storm Series
®
Wheelchairs 38 Part No. 1104849
SEAT FRAMESECTION 6
SEAT FRAME
INSTALLING/REMOVING ASBA SUBASSEMBLY AND/OR
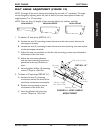
COMPONENT REPLACEMENT (FIGURE 6)
CONVERTING FROM ASBA TO STANDARD SEAT FRAME OR
VAN SEAT
NOTE: This section must be performed in conjunction with a starting procedure.
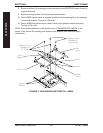
1. Remove the four (4) mounting screws that secure the two (2) support brackets of
the ASBA subassembly to the seat mounting plates.
2. To complete conversion, refer back to the starting procedure to complete the
desired change.
CONVERTING FROM STANDARD SEAT FRAME OR VAN SEAT
TO ASBA
NOTE: This section must be performed in conjunction with a starting procedure.
NOTE: When converting the seat frame, you will need a seat pan, seat cushion, back upholstery
and spreader bar (if applicable). Spreader bars are only required on seat depths of greater than
19-inches.
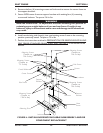
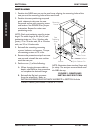
1. Secure both support brackets to the seat mounting plates with four (4) mounting
screws and locknuts. Torque mounting screws to 156 in-lbs.
2. Secure the center frame to the support brackets with four (4) mounting screws,
locknuts, and spacers. Torque to 156 in-lbs.
3. Insert the side frame into the center frame and secure with mounting screw, coved
spacer, spacer, and locknut. Torque to 75 in-lbs. Repeat for opposite side frame.
COMPONENT REPLACEMENT
1. Perform the instructions outlined in PREPARATION FOR REMOVING/INSTALLING
SEAT FRAME (STANDARD FRAME, ADJUSTABLE FRAME, AND VAN SEAT) in this
section of the manual.
NOTE: Note the mounting hole position of the current side frame(s) for proper installation of the
NEW side frame(s).
2. Remove the two (2) mounting screws, coved spacers, spacers, and locknuts that
secure the side frame to the center frame.
3. Perform one (1) of the following:
A. If center frame needs replaced, repeat STEP 2 for opposite side frame and
proceed to STEP 4.
B. If opposite side frame needs replaced, repeat STEP 2, then proceed to STEP 6.
Otherwise proceed to STEP 6.


