


70
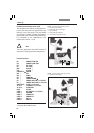
7. Start-up
• Switch to the 10x objective (if not present, the
20x objective).
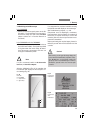
• Ensure that the condenser is at the correct
height. The condenser height adjustment lets
you set the condenser head to the height of
the nominal free working distance. (For an S23
condenser, for example, the distance between
the surface of the stage and the front lens of
the condenser is approx. 23 mm).
• Hold a piece of white paper (approx. 3-10 cm)
under the light source (field diaphragm).
A light ring should appear on the paper – if
not, check the power cable, the light source
and the fuse of the supply unit (CTR box) and
ensure that all of the parts are correctly con-
nected to one another.
• Open the field diaphragm as far as possible
until the light ring reaches its maximum diam-
eter.
• Next, hold the paper under the condenser, di-
rectly on the stage. Open the aperture dia-
phragm as far as possible, until the light ring
has reached its maximum brightness. In order
to achieve maximum brightness, ensure that
no port is activated. The full light should be di-
rected to the VIS port.
• Check the magnification changer to ensure
that the 1x tube lens is selected.
• Adjust the lenses of the eyepieces so that
one
circle is visible in the eyepieces (not two!). If
you wear spectacles, remove the antiglare
hoods from the eyepiece tubes (or fold them
back).
• Ensure that the focus on the eyepieces is set
to ±0 (turn the upper part of the eyepiece
tubes until the silver ring is just covered).
•You should see light when looking through the
eyepieces at this point.
If the light is too bright, reduce it as required.
Remove all unneeded components from the light
path.
• Swing all filters (in the filter magazine of the
lamp housing or the filter holder of the con-
denser) out of the beam path.
• Set the condenser disk to the bright field posi-
tion.
• If your microscope is equipped for DIC:
• Remove the polarizer.
• Remove the analyzer.
• Remove the objective prism (move the
magazine to the “empty” or “bright field”
position).
• If your microscope is equipped for fluores-
cence:
• Select an empty filter position (or a filter
with low transmission in the visible range,
e.g. filter A).
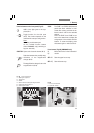
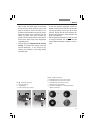
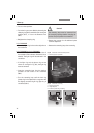
Now to begin with the actual Koehler illumina-
tion:
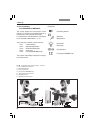
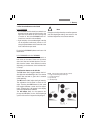
• Place your specimen on the stage and focus
so that you can see its details as clearly as
possible. You probably will not get a perfect
image at this point, as the illumination will not
be optimal (90a).
• Next, attempt to get a sharp image (or at least
a part of the image at the edge) by carefully
moving
the condenser up and down (90.2). Try
this with a variety of field diaphragm settings
until you get a clear, sharp image (91.b). This
may take a while!
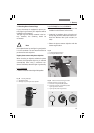
•To center the sharp image, insert the
centering keys in the openings provided at ei-
ther side of the top part of the condenser
(90.1). Move the image into the center of the
field of view (91.c). Next, open the field dia-
phragm until the image fills nearly the entire