


53
6. Assembly
The positions in the turret disk are numbered.
Depending on your equipment, the individual fil-
ter and reflector cubes have already been as-
signed to specific positions at the factory. For
details, check the identification sheet included
with your order.
Now open the drawer several mm further until it
clicks into its end position. The disk will no
longer turn in this position.
You can now insert a filter block. Proceed as fol-
lows:
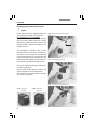
•With the holder facing you squarely, insert the
filter or reflector cubes into the holder in ac-
cordance with the included identification
sheet.
• The fluorescence cubes are suitable for both
upright and inverted microscopes. When us-
ing them with inverted microscopes, insert
them so that the writing is upside down along
the lower edge.
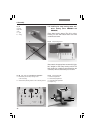
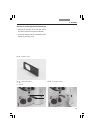
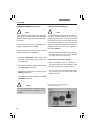
To do so, place the filter or reflector cube on
the left side and press it to the right into the
mounting (Fig. 68).
• Ensure that the cube is correctly seated. A
loose cube can block the disk or be destroyed
by the turning disk.
• For the next cube, close the drawer to the
point that the disk is once again free to turn.
Once you have reached the next position,
open the drawer fully once again. Continue in
this way for all of the cubes.
• Once all filter and reflector cubes have been
inserted, close the drawer and replace the
analyzer or cap.
Replacing cubes with the instrument switched
on:
• Remove the analyzer or the cap of the
analyzer slot.
• Press and hold the Shutter button on the front
panel and press the button of the cube you
would like to insert or replace
at the same
time.
• The filter changer will then rotate to the cor-
rect position to insert or replace the cube
when you open the drawer by pressing the
white button on the right side of the stand.
The following message will appear in the top
line of the LeicaScreen.
Load.
To insert the cubes, proceed exactly as de-
scribed above.