


42
This Procedure includes the following:
Installing Wheel Locks When Using 12-inch
Rear Wheels
Installing Wheel Locks When Using 20, 22 or
24-inch Rear Wheels
Wheel Lock Adjustment
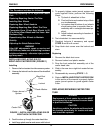
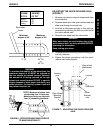
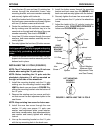
Installing Anti-Tippers
Adjusting the Anti-Tippers if Rear Wheel Height
is Changed
WARNING
After ANY adjustments, repair or service and
BEFORE use, make sure all attaching hardware
is tightened securely - otherwise injury or dam-
age may result.
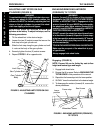
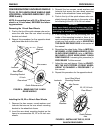
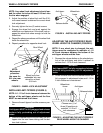
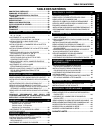
INSTALLING WHEEL LOCKS WHEN USING
20, 22, OR 24-INCH REAR WHEELS
(FIGURE 2)
NOTE: When changing the position of the rear
wheels, the wheel locks MUST be repositioned.
1. Position the wheel lock assembly on the
ANGLED portion of the wheelchair frame where
they will not interfere with the seat frame stops.
(FIGURE 2).
2. Loosely tighten the two (2) socket screws that
secure the wheel locks to the wheelchair frame.
3. Adjust the wheel locks. Refer to WHEEL LOCK
ADJUSTMENT in this section of the manual.
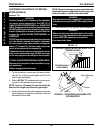
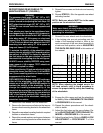
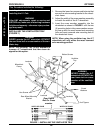
WHEEL LOCK ADJUSTMENT (FIGURE 3)
NOTE: Before adjusting or replacing the wheel
lock assemblies, ensure that the tires are inflated
to the recommended p.s.i on the side wall of the
tire.
1. Loosen the two (2) socket screws that secure
the wheel lock assembly to the wheelchair frame.
FIGURE 2 - INSTALLING WHEEL LOCKS
WHEN USING 20, 22, OR 24-INCH REAR
WHEELS
Socket screws
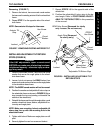
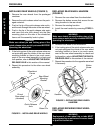
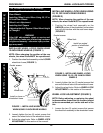
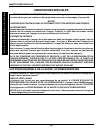
INSTALLING WHEEL LOCKS WHEN USING
12-INCH REAR WHEELS (FIGURE 1)
NOTE: When changing the position of the rear
wheels, the wheel locks MUST be repositioned.
1. Position the wheel lock assembly on the LOWER
wheelchair frame (FIGURE 1).
Wheel lock
Install on angled
portion of wheelchair
frame
Install on lower
wheelchair frame
FIGURE 1 - INSTALLING WHEEL LOCKS
WHEN USING 12-INCH REAR WHEELS
2. Loosely tighten the two (2) socket screws that
secure the wheel locks to the wheelchair frame.
3. Adjust the wheel locks. Refer to WHEEL LOCK
ADJUSTMENT in this section of the manual.
Socket screws
Wheel lock
WHEEL LOCKS/ANTI-TIPPERSPROCEDURE 7
W
H
E
E
L
L
O
C
K
S
A
N
T
I
T
I
P
P
E
R
S