


40
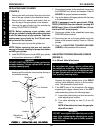
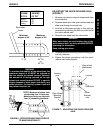
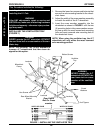
REPOSITIONING REAR WHEELS TO
MAINTAIN STABILITY (FIGURE 6)
WARNING
The necessary back angle (90
o
, 99
o
, 108
o
or 120
o
)
MUST be selected BEFORE repositioning the rear
wheels forward and adjusting the limit stops. DO
NOT adjust the back angle (90
o
, 99
o
, 108
o
or 120
o
)
AFTER the rear wheels have been repositioned
forward.
Rear wheels may have to be repositioned rear-
ward depending on the degree of tilt-in-space re-
quired. Mount rear wheels in the LAST mounting
hole when using 45
o
tilt-in-space on short seat
frames (15 to 18-inches) and medium seat frames
(17 to 20-inches). Mount rear wheels in the LAST
mounting hole when using 35
o
tilt-in-space on
long seat frames (21 to 22-inches).
To maintain the stability of the wheelchair when
moving the rear wheels to ANY forward position,
the amount of tilt MUST be limited by adjusting
the limit stops on the gas cylinders to prevent
the wheelchair from tipping onto the anti-tippers.
ALWAYS ensure stability BEFORE using maxi-
mum amount of tilt-in-space. TEST wheelchair
BEFORE occupied for safety.
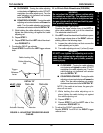
When repositioning 12-inch rear wheels along the
wheelchair frame, use ONLY one (1) of the BACK
four (4) rear mounting positions to ensure proper
engagement of the wheel locks.
RECLINERS ONLY: Before using ANY recline po-
sition of this wheelchair, make sure the rear
wheels are in the MOST REARWARD position to
maintain the stability of the wheelchair. Do not
change the handling/maneuverability of the
wheelchair by moving the rear wheels to ANY of
the forward positions. Moving the rear wheels to
ANY of the forward positions WILL change the
center of gravity of the wheelchair, making the
wheelchair less stable.
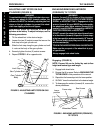
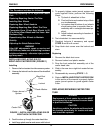
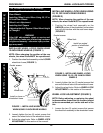
1. Remove the rear wheels from the wheelchair.
2. Remove the hex screws and locknuts that secure
the rear wheel mounting bracket to the wheelchair
frame.
3. Reposition rear wheel mounting bracket to required
location on wheelchair frame.
4. Reposition coved washers and spacer between
rear wheel mounting bracket and the wheelchair
frame.
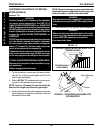
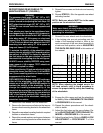
PROCEDURE: 545637
Tilt-in-Space ✓ ● ✓✓N/A ✓
Back Angle ✓✓● ✓ N/A ✓
Rear Wheels ✓✓✓● N/A ✓
Seat Depth ✓✓N/A ✓ ● ✓
Wheel Locks N/A ✓✓✓✓●
NOTE: When adjusting the shaded area in the
left hand column, refer to the
✓✓
✓✓
✓ procedure to
ensure the proper stability, safety and handling
of the wheelchair.
Limit Stops
Tilt-in-Space
Back Angle
Rear Wheels
Seat Depth
Wheel Locks
9. Engage the tilt-in-space and test the wheelchair
for stability. Refer to ENGAGING TILT-IN-SPACE
in PROCEDURE 5 of this manual.
10. Repeat the above procedures until the wheel-
chair is stable.
11. Adjust the limit stops on the gas cylinders. Re-
fer to ADJUSTING LIMIT STOPS ON GAS CYL-
INDERS in PROCEDURE 5 of this manual.
12. Adjust the wheel locks. Refer to WHEEL LOCK
ADJUSTMENT in PROCEDURE 7 of this
manual.
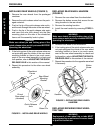
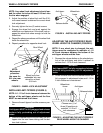
5. Reinstall hex screws and locknuts and securely
tighten.
6. Repeat STEPS 2 - 5 for the opposite rear wheel
mounting bracket.
NOTE: Both rear wheels MUST be in the same
position on the wheelchair frame.
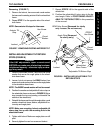
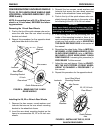
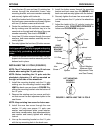
WARNING
Make sure detent pin and locking pins of the
quick-release axles are fully released BEFORE
operating the wheelchair.
7. Reinstall the rear wheels onto the wheelchair.
8. If the locking pins are not protruding past the
inside of the mounting bracket or there is too
much movement of the rear wheel assembly in
a back and forth position, refer to ADJUSTING
THE QUICK-RELEASE AXLE in this section of
the manual.
WHEELS
PROCEDURE 6
W
H
E
E
L
S