


39
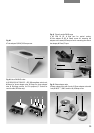
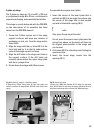
3-plate x/y stage
The 3-plate x/y stage no. 19, size 247 x 230 mm,
x-y adjustment range 60 x 40 mm, is delivered in
separate packaging and assembled as follows:
This stage is usually delivered with the DM IRM,
so the description of its assembly has been
taken from the DM IRM manual!
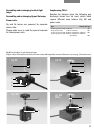
1. Screw the 3 Allen screws out of the stage
support surfaces and wipe any remains of
packaging or dust, etc. from the stage with a
clean cloth.
2. Align the stage with the x-y drive (49.1) at the
front right and lay it so that its undersurface
rests on the stage support surfaces.
3. Align the drill holes in the stage over those in
the support surface. If the drill holes are
covered, please adjust the upper stage plate
with the x-y stage drive.
4. Screw down the stage with Allen screws.
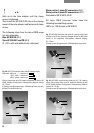
To assemble the square insert plate:
1. Insert the corner of the insert plate that is
marked red (50.5) at an angle from above into
the corner of the stage that is also marked
red and is fitted with a spring (50.5).
n. b.:
Only press the spring at the side!
Do not press the square insert plate onto the
spring from above, as the insert will then not
be aligned plane-parallel to the stage and
can be bent.
2. Drill holes (50.2) for attaching small biological
specimen clips.
3. Insert the round stage inserts into the
opening (50.1).
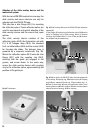
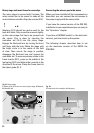
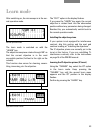
Fig. 49 3-plate x/y stage no. 19 without inserts
1 Stage drive, 2 Rear fixing holes, 3 Front fixing hole (not
visible, concealed by stage plate), 4 Corner with red dot and
spring
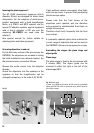
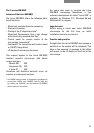
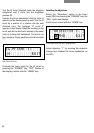
Fig. 50 3-plate x/y stage
1 Insert ring, 20/40 mm diameter, 2 Drill holes for specimen
clips, 3 Drill holes for securing the stage, 4 Coaxial drive for
specimen positioning with universal joint, 5 Red markings
!
3 5 2 1 2
3
4
22
4
3
1