


100
Assembly /adjustment
Assembly
When taking the following steps, consult the
manual for the Leica DM IRB/E manual.
n. b.:
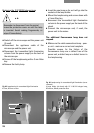
Before installing the LMC components, remove
the field diaphragm. Also remove any filters,
prisms and interference contrast components.
Screw the LMC objectives into the objective
nosepiece.
Replace the condenser on the microscope with
the S40/0.50 LMC condenser. First check that the
inserted light slit diaphragms match the
objectives in the nosepiece. The light slit dia-
phragms are labelled, for example, LMC 10,
LMC 20 or LMC 40.
Example: LMC 10 diaphragms belong to the
C PLAN 10x/0.22 LMC objective.
The light diaphragms are usually assembled at
the factory to match the supplied objectives. If
the light slit diaphragms are supplied separately,
they must be inserted in the positions in the
condenser disc to match the objectives used.
!
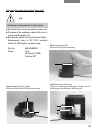
Adjustment
Open the aperture diaphragm on the condenser
fully.
Switch on the light. Select a medium brightness
setting.
Set the condenser to the brightfield position
and turn the first LMC objective into the light
path (usually the objective with the smallest
magnification).
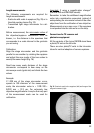
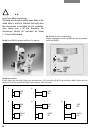
Engage the Bertrand lens using the adjustment
wheel on the right side of the microscope.
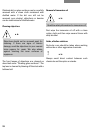
You will now see the modulator built into the
objective as a grey rectangle at the edge of the
field of view. Its position (top, bottom, left, right)
is not fixed and may vary for different objectives.
Focus the image of the modulator using the
Bertrand lens.
Turn the condenser to switch to the light slit
diaphragm whose name corresponds to the
engraving on the objective (e. g. LMV 10 for the
C PLAN 10x objective).
You will now see a bright rectangle.