


110
Changing the Hg and Xe lamps
on lamphousing 106 z
n. b.:
● Always disconnect the power unit from the
mains before carrying out assembly work.
● Wait for the lamphousing to cool down for
at least 15 minutes as otherwise it may
explode.
● Never touch glass parts of the burner with
your bare hands as finger perspiration
burns in.
● Wipe off any finger perspiration and dirt
carefully (perhaps using alcohol).
● Adjust the lamps immediately after ignition.
● Avoid switching on and off frequently, as
this greatly reduces the life and stability of
the lamp. Hot Hg lamps do not ignite again
until they have cooled down. It is advisable
to let new burners burn in for a few hours
without interruption.
● Ensure that lamphousing is adequately
ventilated. Never block the air vents with
paper, etc. (fire risk).
● It is best to keep a record of the number of
hours a lamp has been in use and compare
it with the manufacturer’s specifications.
● We cannot accept any liability for damage
resulting from lamp explosions.
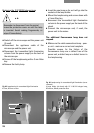
● Disconnect the power unit and the micro-
scope from the mains.
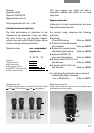
● The LH 106 z L is opened by undoing the fixing
screws (88.4), pulling the cut-out plug slightly
out the socket (88.11) and flipping up the lid of
the lamphousing.
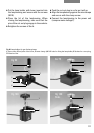
● Slacken the safety screws (88.10) and pull out
the lamp holder (Fig. 90).
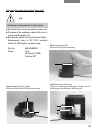
● Insert the burner as follows, making abso-
lutely sure to observe the safety measures
described above:
● If there is a plastic cover on the burner, leave
it on for the time being.
● Insert the burner so that the lettering is
upright after insertion (different diameters of
the metal base for the Hg 100 and Xe 75
burners ensure that these are always inserted
the right way up).
● If the bulb has a glass seal point (90.2), the
burner is turned so that this point will be at the
side, not in the light path.
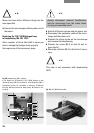
● Put the upper pin of the burner between the
clamps of the flexible power supply and clamp
with screw (90.1).
● Unscrew the stud (90.4) in the holder slightly,
insert the lower end of the metal base and
retighten the stud.
● Remove the protective covering from the
burner now.