


Performance Procedures
Testing the Monitor
4-31
Barometric
Pressure
Check and
Calibration
Check the barometric pressure value in the CO
2
module as follows:
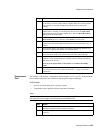
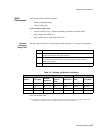
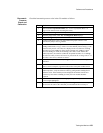
Step Action
1Enter the Power-Up Defaults Menu (see ““Power-Up Defaults Menu” on
page 5-3“for instructions on accessing this menu).
2 Select the Enter Diagnostic Mode? option.
3 From the popup menu, select Yes. The Diagnostic Menu displays.
4 Select the CO
2
Test option.
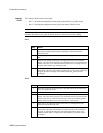
5 Connect a FilterLine to the CO
2
patient monitoring input connector. This
activates the pump in the CO
2
module.
6 Check the status line at the top of the screen. It will display "CO
2
pressure in
mmHg (ambient/cell) xxx/yyy" where xxx is the ambient pressure and yyy is the
measured cell pressure. The values are displayed with a resolution of 2 mmHg
(0.3 kPa) up to 475 mmHg (63.2 kPa) and a resolution of 1 mmHg (0.1 kPa)
from 475 mmHg (63.2 kPa) to 825 mmHg (109.7 kPa). Check whether the
ambient pressure (X1) matches (within the acceptable tolerance of ±12 mmHg)
the reference value you have received. If so, proceed to the “Leakage Check”. If
the value is not correct, calibrate as follows.
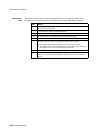
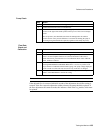
7 Select Set Barometric Pressure (mmHg). An adjustable value in mmHg is
activated.
8 Select the value that matches the reference value received from a reliable local
source, such as an airport, regional weather station or hospital weather station.
9 If the selected value is not with ±12mmHg (1.6 kPa) of the current measured
ambient pressure, verify the reference value by getting another reading from a
different source. If the ambient pressure displayed also differs from the new
reference by more than ±12mmHg (1.6 kPa), the CO
2
module should be
replaced.
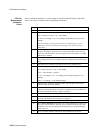
10 Confirm the barometric pressure setting by clicking on the adjusted value so that
it is no longer highlighted.
11 Check that the ambient pressure displayed in the CO
2
Pressure line at the top of
the screen is the same as the value that you selected from the list in Step 8.