


Instruction Manual
IB-106-340 Rev. 2.4
April, 2001
Rosemount Analytical Inc. A Division of Emerson Process Management Maintenance and Service 6-15
Oxymitter 4000
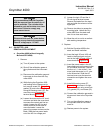
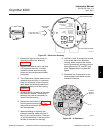
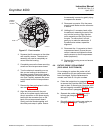
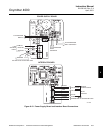
OPTIONAL CERAMIC
DIFFUSION ELEMENT
VEE
DEFLECTOR
HUB
SETSCREW
RETAINER
CEMENT
PORT
CEMENT
FILLET
22220029
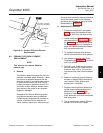
Figure 6-10. Ceramic Diffusion Element
Replacement
6-9 CERAMIC DIFFUSION ELEMENT
REPLACEMENT
NOTE
This refers to the ceramic diffusion
element only.
a. General
The diffusion element protects the cell from
particles in process gases. Normally, it does
not need to be replaced because the vee
deflector protects it from particulate erosion.
In severe environments, the filter may be
broken or subject to excessive erosion. Ex-
amine the ceramic diffusion element when-
ever removing the probe for any purpose.
Replace if damaged.
Damage to the ceramic diffusion element
may become apparent during calibration.
Compare probe response with previous re-
sponse. A broken diffusion element will
cause a slower response to calibration gas.
Hex wrenches needed to remove setscrews
and socket head screws in the following
procedure are available as part of a Probe
Disassembly Kit, Table 9-1.
b. Replacement Procedure
1. Follow the instructions in paragraph
6-4a to remove the Hazardous Area
Oxymitter 4000 from the stack or duct.
2. Loosen setscrews, Figure 6-10, using
hex wrench from Probe Disassembly
Kit, Table 9-1, and remove vee deflec-
tor. Inspect setscrews. If damaged, re-
place with stainless setscrews coated
with anti-seize compound.
3. On systems equipped with abrasive
shield, remove dual dust seal gaskets.
4. Use spanner wrenches from Probe
Disassembly Kit, Table 9-1, to turn hub
free from retainer.
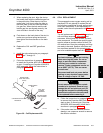
5. Put hub in vise. Break out old ceramic
diffusion element with chisel along ce-
ment line. Use a 3/8 in. (9.5 mm) pin
punch and clean fillet from the cement
port.
6. Break out remaining ceramic diffusion
element by tapping lightly around hub
with hammer. Clean grooves with
pointed tool if necessary.
7. Replace ceramic diffusion element us-
ing the ceramic diffusion element re-
placement kit in Table 9-1. This
consists of a diffusion element, ce-
ment, setscrews, anti-seize compound,
and instructions.
8. Test fit replacement ceramic diffusion
element to be sure seat is clean.
6