


Instruction Manual
IB-106-340 Rev. 2.4
April, 2001
6-12 Maintenance and Service Rosemount Analytical Inc. A Division of Emerson Process Management
Oxymitter 4000
6-7 HEATER STRUT REPLACEMENT
This paragraph covers heater strut replacement.
Do not attempt to replace the heater strut until
all other possibilities for poor performance have
been considered. If heater strut replacement is
needed, order a replacement heater strut.
(Table 9-1).
Use heat resistant gloves and clothing
when removing probe. Do not attempt
to work on the probe until it has
cooled to room temperature. The
probe can be as hot as 800°F (427°C).
This can cause severe burns.
NOTE
If the Oxymitter 4000 has an integrally
mounted SPS 4000, it is not necessary
to remove the sequencer when re-
placing the heater strut.
a. Follow the instructions in paragraph 6-4a.1
to remove the Oxymitter 4000 from the
stack or duct. If removing an Oxymitter
4000/SPS 4000 assembly, follow the in-
structions in paragraph 6-4b.1.
b. Remove entire electronics per paragraph
6-5a, steps 2 through 6.
NOTE
If the Oxymitter 4000 is equipped with
an integrally mounted SPS 4000 and
installed in corrosive conditions,
stainless steel gas tubes are used in-
stead of silicon or Teflon tubes.
c. Carefully remove the CAL and REF gas sili-
con tubes by pulling them off the CAL and
REF gas ports. Pull the silicon tubes off the
CAL and REF gas lines.
d. Loosen, but do not remove, the three
screws (30, Figure 6-1) on the strut in the
finned housing. The spring tension should
release and the strut moves up.
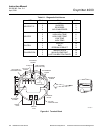
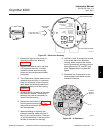
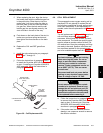
e. Grasp the wire loop and carefully slide the
strut out of the probe tube (Figure 6-8).
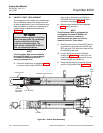
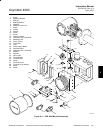
CERAMIC SUPPORT ROD
CELL FLANGE
CERAMIC
DIFFUSER
ASSEMBLY
V-DEFLECTOR
HEATER
WIRE
LOOP
22220050
Figure 6-8. Heater Strut Assembly