


SECTION 9—WHEELS
Part No. 1125075 85 Pronto® Series
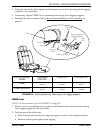
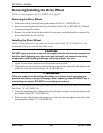
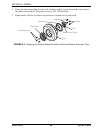
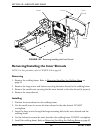
FIGURE 9.4 Removing/Installing the Drive Wheel
Replacing the 2-Piece Wheel Rim and/or the Foam
Filled or Pneumatic Tires
NOTE: For this procedure, refer to FIGURE 9.5 on page 86.
NOTE: When replacing the 2-piece wheel rim, DO NOT remove tire. Replacement 2-piece wheel
rims are shipped assembled with a new tire. Refer to Removing/Installing the Drive Wheel on
page 84 to remove the existing and install the new 2-piece wheel rim and tire.
ƽ WARNING
When replacing the hub of a pneumatic tire, ALWAYS deflate tire before
removing/installing hub - otherwise, injury or damage may occur. Failure to observe
this warning can result in sudden, violent rim separation and possible injury.
1. Deflate existing pneumatic tire.
2. Remove the four existing mounting screws, locknuts and washers that secure the
existing outer rim and inner rim.
3. Separate the two halves of the rim and remove the existing tire. Discard existing tire.
NOTE: When installing the new pneumatic tire, if necessary, place the inner tube into the tire.
NOTE: When installing the outer rim into a pneumatic tire ensure the valve stem of the inner tube
protrudes through the stem opening in the outer rim.
4. Insert the outer rim and inner rim into the new/existing tire.
5. Insert the hub into the inner rim and align the four mounting holes of the hub, inner
rim and outer rim.
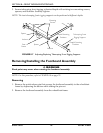
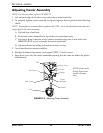
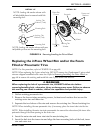
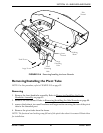
DETAIL “A”
DETAIL “B”
Locking Tab
Washers (Tabs)
Locking Tab
Washer (Tab)
Mounting Bolt
Mounting Bolt
NOTE: Locking tab washer shown with
all tabs folded down to remove/install the
mounting bolt.
NOTE: Locking tab washer shown with one
tab folded up to secure the mounting bolt.
Mounting
Bolt
Drive Shaft
Motor and
Gearbox
Washer
Keystock
Wheel
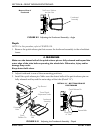
Outer Rim
Cutout
Locking
Tab
Locking Tab
Washer