


SECTION 13—ELECTRONICS
Pronto® Series 126 Part No. 1125075
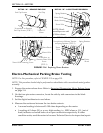
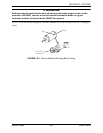
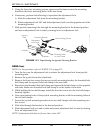
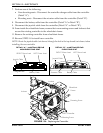
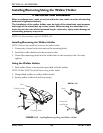
7. Perform one of the following:
• Non-elevating seats - Disconnect the controller charger cable from the controller
(Detail “A”).
• Elevating seats - Disconnect the actuator cable from the controller (Detail “B”).
8. Disconnect the battery cable from the controller (Detail “A”or Detail “B”)
9. Disconnect the joystick cable from the controller (Detail “A” or Detail “B”).
10. From inside the wheelchair frame, remove the two mounting screws and locknuts that
secure the existing controller to the wheelchair frame.
11. Remove the existing controller from wheelchair frame.
12. Reverse STEPS 1-8 to install new controller.
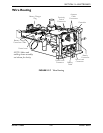
NOTE: Route the joystick cable (not shown) through the hole in the top shroud (not shown) when
installing the new controller.
FIGURE 13.6 Replacing the Controller
RIGHT Motor Lead
LEFT Motor Lead
Battery Cable
Joystick Cable
Wheelchair
Frame
Charger Cable
Mounting Screw
MK5 Controller
DET
A
IL “
A
” -
CO
NTR
O
LLER F
O
R
NON-ELEVATING SEAT
DET
A
IL “B” -
CO
NTR
O
LLER F
O
R
ELEVATING SEAT
Locknut
Mounting Screw
Locknut
RIGHT Motor Lead
LEFT Motor Lead
Battery Cable
Joystick Cable
Actuator Cable