


SECTION 10—CHECK VALVES
Platinum™Series 56 Part No 1110538
SECTION 10—CHECK VALVES
Replacing Check Valves
ƽ DANGER
To prevent electrical shock, ALWAYS disconnect concentrator from electrical
outlet before servicing.
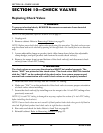
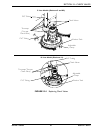
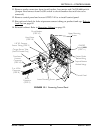
NOTE: For this procedure, refer to FIGURE 10.1 on page 57.
1. Unplug unit.
2. Remove cabinet. Refer to Removing Cabinet
on page 25.
NOTE: Replace one or both check valves when performing this procedure. The check valves are one-
way directional and can be checked by passing air through them. Air should flow in one direction
only.
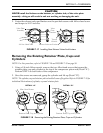
3. Loosen adjustable clamp on product tank, slide clamp down below the adjustable
clamp hanger, and pull product tank forward to access check valve(s).
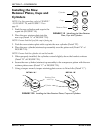
4. Remove tie-wraps from top and bottom of the check valve(s) and disconnect check
valve(s) from ¼-inch PVC tubing.
ƽ WARNING
The check valves are one-way directional and MUST be installed correctly. The
letters “VAC” are printed on the check valves. The check valves MUST be installed
with the “VAC” on the underside of the check valve. Low system pressures and
eventual bed contamination will result if check valves are not properly installed.
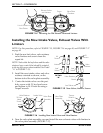
5. Install the new check valve(s) into the ¼-inch PVC tubing.
6. Make sure “VAC” is on the underside of the check valve to ensure proper orientation
of check valves when installing.
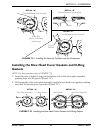
7. Secure the check valve(s) by installing new tie-wraps to the ¼- inch PVC tubing where
previously removed.
NOTE: If ¼-inch PVC tubing is damaged in any way, replace the section of ¼-inch PVC tubing
before installing check valve(s).
NOTE: Ensure check valves are not crossed. Left barb product tank check valve goes to left barb on
sieve bed. Right barb product tank check valve to right barb on sieve bed.
8. Run units and check for leaks. Refer to Leak Test on page 89.
9. Reinstall cabinet. Refer to
Removing Cabinet on page 25.