


SECTION 7—COMPRESSOR
Platinum™Series 42 Part No 1110538
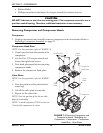
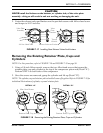
CAUTION
DO NOT lubricate or use oil on any moving parts. The compressor eccentric uses a
precision sealed bearing.
DO NOT crimp the piston cup when you replace the sleeve. If the cup is crimped, it
MUST be replaced.
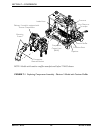
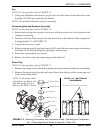
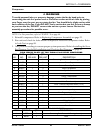
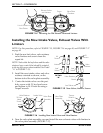
3. With bearing side of connecting rod/eccentric assembly facing the center (motor) of
the compressor, slide the assembly onto the shaft bringing it flush to the motor
bearing.
NOTE: Make sure the eccentric set screw is positioned over the flat of the shaft.
4. Using the access hole, tighten set screw to 40 inch-lbs (Detail “A” of FIGURE 7.5).
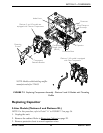
5. Hold the sleeve down to the housing with one hand and slowly rotate the eccentric
with the other hand to ensure all the components are aligned properly.
Fan
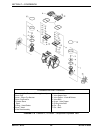
NOTE: For this procedure, refer to FIGURE 7.5 on page 39.
1. Reinstall the fan onto the shaft in original orientation. Secure into position using a
rubber mallet.
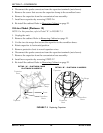
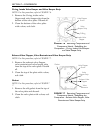
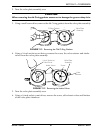
Valve Plate
NOTE: For this procedure, refer to FIGURE 7.4 on page 38.
1. With the sleeve located and firmly seated on the housing, replace the valve plate in the
same manner as it was.
2. Repeat step 1 for other valve plate.
NOTE: Make sure the top edge of the sleeve locates in the O-ring groove in the bottom of the valve
plate.
CAUTION
Make sure that the O-ring is not twisted when seated in the groove of the bottom of
the valve plate.
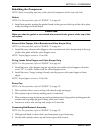
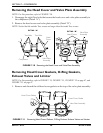
Compressor Heads
NOTE: For this procedure, refer to FIGURE 7.4 on page 38.
1. Place the heads on top of the valve plates.
2. Tighten the head screws in a criss-cross pattern to 40 inch-lbs.