


SECTION 7—COMPRESSOR
Part No 1110538 39 Platinum™Series
Fan
NOTE: For this procedure, refer to FIGURE 7.5.
1. Using two flat blade screwdrivers, pry the fan off of the motor shaft under the center
housing. DO NOT pry under the fan blades.
NOTE: Note position/orientation of fan for reassembly.
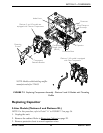
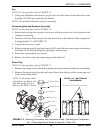
Connecting Rod and Eccentric Assembly
NOTE: For this procedure, refer to FIGURE 7.5.
1. Rotate shaft to align the eccentric's set screw with the access hole in the bottom of the
compressor housing.
2. Insert the 1/8-inch Allen wrench into the access hole in the bottom of the compressor
housing (Detail “A” of FIGURE 7.5).
3. Loosen the set screw ¼ turn.
4. Rotate connecting rod to top dead center (180°) and slide the connecting rod/eccentric
assembly off the shaft through the opening in the housing.
5. Secure the rod assembly in a fixture.
6. Remove the sleeve from the connecting rod and discard.
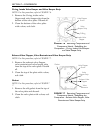
Piston Cup
NOTE: For this procedure, refer to FIGURE 7.5.
1. Remove the torque screw (discard) from the piston cup retainer (retain for reassembly).
2. Remove the piston cup (discard) and wipe debris from the top of the connecting rod
with a clean damp cloth.
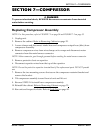
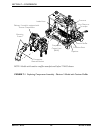
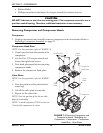
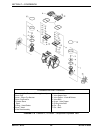
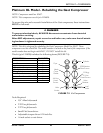
FIGURE 7.5 Removing Compressor and Compressor Heads - Rebuilding the Compressor -
Fan - Connecting Rod and Eccentric Assembly - Piston Cup
Cylinder Sleeve
Retainer
Piston Cup
Rod Top
Torque Screw
Fan
Connecting
Rod
Eccentric
Set Screw
(hidden)
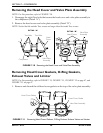
NOTE: As the piston travels
up and down it will also rock
from side-to-side. This is a
feature of the WOB-L Piston.
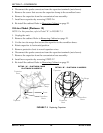
DETAIL “A” - BOTTOM OF
COMPRESSOR
Eccentric Set Screw Access Hole