


SECTION 7—COMPRESSOR
Part No 1110538 41 Platinum™Series
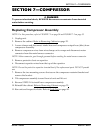
Rebuilding the Compressor
NOTE: Before reassembly, wipe any residue from all components with a clean soft cloth.
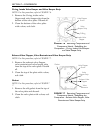
Gasket
NOTE: For this procedure, refer to FIGURE 7.7 on page 40.
1. Install new gasket; seating the gasket firmly in the groove at the top of the valve plate
with your finger or blunt object.
CAUTION
Make sure that the gasket is not twisted when seated in the groove of the top of the
valve plate.
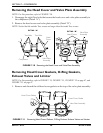
Exhaust Valve Flapper, Valve Restraint and Valve Keeper Strip
NOTE: For this procedure, refer to FIGURE 7.7 on page 40.
1. Install the new exhaust valve flapper, valve restraint and valve keeper strip to the top
of the valve plate with the valve flapper screw.
NOTE: Torque flapper screws to 12 inch-lbs.
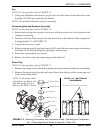
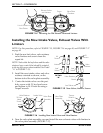
O-ring, Intake Valve Flapper and Valve Keeper Strip
NOTE: For this procedure, refer to FIGURE 7.6 on page 40.
1. Install the new valve keeper strip on top of the new intake valve flapper so that the
word "UP" is visible. Fasten with the valve flapper screw.
2. Install the new O-ring, seating it firmly into the groove with your finger or blunt
object.
NOTE: Torque flapper screws to 12 inch-lbs.
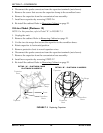
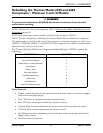
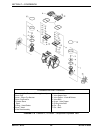
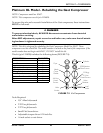
Piston Cup
NOTE: For this procedure, refer to FIGURE 7.5 on page 39.
1. Place cylinder sleeve over rod top with smooth edge facing up.
2. Place piston cup on rod top making sure it is centered.
3. Place retainer on top of piston cup and seat retainer in rod top pocket, making sure the
retainer and cup align properly along with screw holes.
4. Insert new screw into rod top and torque to 30 inch-lbs.
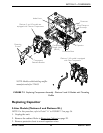
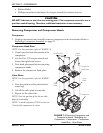
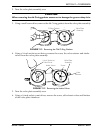
Connecting Rod/Eccentric Assembly
NOTE: For this procedure, refer to FIGURE 7.5 on page 39.
1. With gloved-hand or clean cloth, pre-form piston cup if necessary.
2. Gently slide cylinder sleeve up and over cup to fully form it.