


Teledyne API T802 Paramagnetic O
2
Analyzer Operation Manual Troubleshooting and Service
217
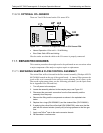
2. Turn off power to the instrument, fold down the rear panel by loosening the
mounting screws.
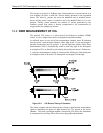
3. When looking at the electronic circuits from the back of the analyzer, locate
the Disk-on-Module in the right-most socket of the CPU board.
4. The DOM should carry a label with firmware revision, date and initials of the
programmer.
5. Remove the nylon standoff clip that mounts the DOM over the CPU board,
and lift the DOM off the CPU. Do not bend the connector pins.
6. Install the new Disk-on-Module, making sure the notch at the end of the chip
matches the notch in the socket.
7. It may be necessary to straighten the pins somewhat to fit them into the
socket. Press the chip all the way in.
8. Close the rear panel and turn on power to the machine.
9. If the replacement DOM carries a firmware revision, re-enter all of the setup
information.
11.8. FAQ’S
The following is a list from the Teledyne API’s Technical Support Department of
the most commonly asked questions relating to the Model T802 O
2
Analyzer.
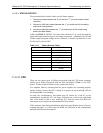
QUESTION ANSWER
Why does the ENTR button
sometimes disappear on the
Front Panel Display?
During certain types of adjustments or configuration operations, the
ENTR button will disappear if you select a setting that is nonsensical
(such as trying to set the 24-hour clock to 25:00:00) or out of the
allowable range for that parameter (such as selecting a DAS HOLD
OFF period of more than 20 minutes). Once you adjust the setting in
question to an allowable value, the ENTR button will re-appear.
Why is the ZERO or SPAN
button not displayed during
calibration?
The instrument disables these buttons when the expected span or
zero value entered by the users is too different from the gas
concentration actual measured value. This is to prevent the
accidental recalibration of the analyzer to an out-of-range response
curve. EXAMPLE: The span set point is 16% but gas concentration
being measured is only 5%.
How do I enter or change the
value of my Span Gas?
Press the CONC button found under the CAL button of the main
SAMPLE display menus to enter the expected CO
2
span
concentration. See Section 9.2.3.1 or for more information.
Why does the analyzer not
respond to span gas
Section 11.4 has some possible answers to this question.
What shall I do if the
concentration on the
instrument's front panel display
does not match the value
recorded or displayed on my
data logger even if both
instruments are properly
calibrated?
This most commonly occurs for one of the following reasons: - A
difference in circuit ground between the analyzer and the data logger
- A wiring problem or a scale problem with the input to the data
logger. The analog outputs can be manually adjusted to compensate
for either or both of these effects, see Section 5.9.5; - The analog
outputs a
r
e not calibrated, which can happen after a firmware
upgrade. - Both the electronic scale and offset of the analog outputs
can be adjusted (Section 5.9.3.2). Alternately, use the data logger
itself as the
meterin
g device during calibrations procedures.
07275B DCN6418