


Instruction Manual
IM-106-340, Rev. 4.0
May 2006
9-17
Oxymitter 4000
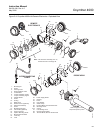
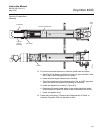
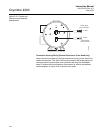
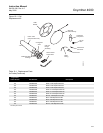
Figure 9-10. Cell Replacement Kitl
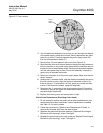
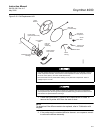
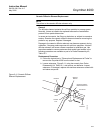
1. Follow the instructions in "Removal and Replacement of Probe" to
remove the Oxymitter 4000 from the stack or duct.
NOTE
To determine if the diffuser needs to be replaced, refer to "Calibration with
Keypad".
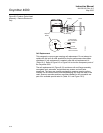
2. If the probe uses the standard diffusion element, use a spanner wrench
to remove the diffuser assembly.
35830009
Wire and
Pad Assembly
Anti-Seize
Compound
22 Ga.
Wire
Closed end
Connector
Set Screws
Teflon
Tubing
Socket Head
Cap Screws
Cell and
Flange
Assembly
Calibration Gas
Passage
ANSI
Gasket
Probe Tube
(Not Included in Kit)
Corrugated
Seal
Use heat-resistant gloves and clothing when removing the probe. Do not attempt to work on
these components until they have cooled to room temperature. Probe components can be
as hot as 572°F (300°C). This can cause severe burns.
Disconnect and lock out power before working on any electrical components. There is
voltage of up to 115 VAC.
Do not remove the cell unless certain it needs to be replaced. Removal may damage the
cell and platinum pad. Go through the complete troubleshooting procedure to make sure the
cell needs to be replaced before removing it.