


13
Beginner’s Guide to Baking Your First Loaf
The following instructions are to be used when making Bread or Dough recipes from the recipe section in this book.
All recipes use local ingredients and Australian Standard Metric measuring tools (cup, spoons and weighing scales), for accuracy in producing 1.25Kg
(1250g), 1Kg (1000g) or 750g loaf.
Remove and safely discard any packaging materials and promotional labels before using the ikon™ Baker’s Oven for the first time.
Step 3: Add ingredients into the bread pan
It is important that the ingredients are added in the correct order listed in
the recipe and that the ingredients are measured and weighed accurately
otherwise the dough may not mix correctly or rise sufficiently. Ensure
the collapsible kneading blade is in the upright position before adding
ingredients to the bread pan.
All ingredients should be at room temperature 20-25°C and be added in
the following order:
Liquid ingredients
Fat
Dry Ingredients: salt, sugar, flour
Yeast
1)
2)
3)
4)
Step 2: Insert the kneading blade
There are two kneading blades provided with the ikon™ Baker’s Oven.
The collapsible blade is for use on the Bread and Dough settings. The
standard blade is for use on the Jam setting. It is important that when
using either kneading blade that it is properly mounted on the shaft in the
base of the bread pan by aligning the flat edge in the central hole of the
kneading blade with the flat side of the shaft. If either blade is not seated
correctly, ingredients may not be mixed or kneaded properly.
The collapsible blade should be placed on the shaft in the upright position
to ensure the ingredients are mixed and kneaded properly when the
kneading cycle commences. The further kneading action of the bread
machine ensures that the blade is upright or flat at the appropriate times
in the kneading, rising and baking cycles.
Before inserting the collapsible blade, ensure that no baked bread
residue remains attached to the shaft inside the bread pan, or
inside the hole or around the hinge area of the collapsible kneading
blade. This will ensure that the hinge pivots freely. For further
cleaning instructions refer to Page 24.
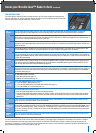
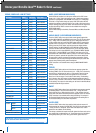
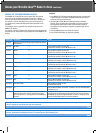
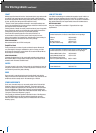
OPERATION LCD SCREEN ACTION
1st Press Shows the total time for the last recipe programmed and the
NUTS selected.
2nd Press PRE-HEAT 0
Press Up ▲ Arrow button to enter time
- maximum 60 minutes or Down ▼ button to 0.00
3rd Press KNEAD 1 0
Press Up ▲ Arrow button to enter time
- maximum 60 minutes or Down ▼ button to 0.00
4th Press KNEAD 2 0
Press Up ▲ Arrow button to enter time
- maximum 60 minutes or Down ▼ button to 0.00
5th Press RISE 1 0
Press Up ▲ Arrow button to enter time
- maximum 100 minutes or Down ▼ button to 0.00
6th Press PUNCH DOWN :00
Press Up ▲ Arrow button to enter time
- maximum 60 seconds or Down ▼ button to 0.00
7th Press RISE 2 0
Press Up ▲ Arrow button to enter time
- maximum 100 minutes or Down ▼ button to 0.00
8th Press SHAPING :00
Press Up ▲ Arrow button to enter time
- maximum 60 seconds or Down ▼ button to 0.00
9th Press RISE 3 0
Press Up ▲ Arrow button to enter time
- maximum 100 minutes or Down ▼ button to 0.00
10th Press BAKE 0
Press Up ▲ Arrow button to enter time
- maximum 150 minutes or Down ▼ button to 0.00
11th Press NUTS (YES OR NO)
Press Up ▲ Arrow button for YES
or Down ▼ button to NO
12th Press
0°C
Press Up ▲ Arrow button to increase - maximum 150°C or Down ▼ button
to decrease to 0°C
13th Press
Shows total time for the current recipe programmed and
the NUTS selected. The word SET appears in the lower
right-hand side corner. (Two beeps sound if the BEEPER is
turned on).
The MANUAL SET function has now been reprogrammed. (If you wish to
check the times and temperature programmed you can do so now by using
the MANUAL SET button to progress through 1st press to 13th press). Then
press the START/PAUSE button to commence operation.
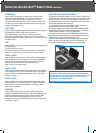
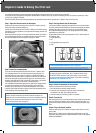
Step 1: Open the lid and remove the bread pan
Open the lid and remove the bread pan from the ikon™ Baker’s Oven by
holding the handle and lifting straight up.
Always remove the bread pan from the ikon™ Baker’s Oven before adding
ingredients to ensure ingredients are not spilt into the baking chamber and
onto the element.
Before using for the first time, we recommend that the inside of the bread
pan and the kneading blades are washed with warm soapy water, rinsed
and dried thoroughly. Do not immerse the bread pan in water.
If using Prepackaged Bread Mixes, refer to page R34.
Mound the flour into the pan, make a small hollow in the centre
and place the yeast in the hollow. This is important when using
the PRESET TIMER, because if the yeast comes in contact with
the water and is activated at some length of time before kneading
commences, the bread may not rise.
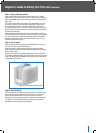
Step 4: Return the bread pan to the machine
Insert the bread pan into the machine as follows:
Place the bread pan into the baking chamber.
Locate the drive mechanism of the pan directly into the drive
mechanism in the base of the baking chamber.
Push the bread pan down firmly until it is in position.
Step 5: Close the lid
After closing the lid, it is not recommended to open the lid during operation
except to check the consistency of the dough in the kneading cycle, or to
glaze and add seeds to the top of the loaf in the baking cycle (Refer page
R40).
Step 6: Plug in the bread machine
Insert the power plug into a 230/240 volt power outlet. Switch on at the
power outlet.
When the ikon™ Baker’s Oven is plugged in and switched on, the LCD
Screen will automatically show 1250g 3:20 NO NUTS, with arrows aligned
to BASIC and MEDIUM.
1)
2)
3)