


Instruction Manual
IB-106-340 Rev. 3.0
December 2003
Rosemount Analytical Inc. A Division of Emerson Process Management Maintenance and Service 9-3
Oxymitter 4000
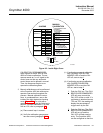
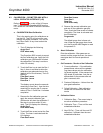
SW2 DIP SWITCH
HART
LOCAL
0-10%
0-25%
4mA 20mA
NOT USED
NOT USED
LED
HEATER
O2 CELL
CALIBRATION
HEATER T/C
STATUS
OPEN
SHORTED
REVERSED
HIGH HIGH
TEMP
HIGH CASE
TEMP
LOW TEMP
HIGH TEMP
OPEN
BAD
EPROM
CORRUPT
INVALID SLOPE
INVALID
CONSTANT
FLASHES
1
2
3
4
1
2
OPEN
3
4
5
1
3
4
1
2
PUSH CAL
CAL LED ON
APPLY TG1
PUSH CAL
CAL LED ON SOLID
REMOVE TG1 & APPLY TG2
PUSH CAL
CAL LED ON SOLID
WAIT FOR FLASH
REMOVE TG2
PUSH CAL
1
2
3
4
5
6
7
ALARMS
MANUAL
CALIBRATION
CAL LED ON FOR
PURGE TIME
WAIT FOR FLASH
CAL LED OFF
PUSH CAL
CAL LED FLASH
2 FLASH-VALID CAL
3 FLASH-INVALID CAL
8
PLACE CONTROL LOOP
IN MANUAL
IF CAL LED ON
GO TO STEP 2
*
*
3
LAST CAL
FAILED
A/D COMM
ERROR
29770005
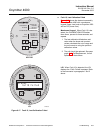
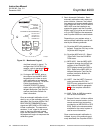
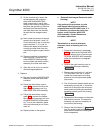
Figure 9-2. Inside Right Cover
CALIBRATION RECOMMENDED
alarm signals an IMPS 4000 or SPS
4000 to initiate a calibration. The se-
quencer sends an “in cal” signal to the
control room so that any automatic
control loops can be placed in manual.
Then, the sequencer begins to se-
quence the calibration gases.
3. Manual calibrations must be performed
at the Oxymitter 4000 site and require
operator intervention throughout the
process. Manual calibration instruc-
tions, in condensed form, are on the
inside of the right electronics housing
cover (Figure 9-2). For units with a
membrane keypad, use the following to
perform a manual calibration. For units
with an LOI, refer to paragraph 9-3.
(a) Place control loop in manual.
(b) Verify the calibration gas parame-
ters are correct (paragraph 9-2a).
(c) If performing a manual calibration
with CALIBRATION RECOM-
MENDED LED off and the CAL
LED off, start at step 1.
(d) If performing a manual calibration
with CALIBRATION RECOM-
MENDED LED on and the CAL
LED on, start at step 2.
1 Push the CAL key. The CALI-
BRATION RECOMMENDED
LED will come on and the
CAL LED will be on solid. If a
multimeter is attached across
TP5 and TP6, the reading will
display the percentage of
oxygen seen by the cell.
2 Push the CAL key. The CALI-
BRATION RECOMMENDED
LED will turn off and the
CAL LED will flash continu-
ously. The Oxymitter 4000
can be configured so that the