


94
FWD WHEELCHAIRSPROCEDURE 17
F
W
D
W
H
E
E
L
C
H
A
I
R
S
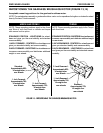
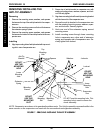
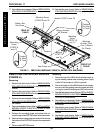
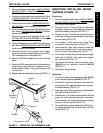
FIGURE 5 - REMOVING/INSTALLING GROUP 24 BATTERY BOX SUB-FRAME
REAR OF
CHAIR
FRONT OF
CHAIR
Mounting
Screw
(STEPS 6
and 13)
Locknut
Wiring Harness
W/ Bracket
Battery Box
Sub-frame
Sub-Frame
Mounting Screw
(STEPS 8 and 12)
Washer (STEP 8 and 12)
Position
Tie Wrap
A Here
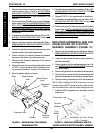
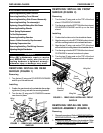
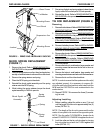
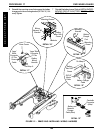
REMOVING/INSTALLING SHOCKS
(FIGURE 6)
Removing
1. Remove the front shroud. Refer to
REMOVING/IN-
STALLING FRONT SHROUD in this procedure of the
manual.
2. Remove the rear shroud. Refer to
REMOVING/IN-
STALLING REAR SHROUD in this procedure of the
manual.
3. Remove the counterweight. Refer to
REMOVING/IN-
STALLING COUNTERWEIGHT in this procedure of
the manual.
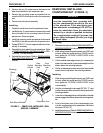
4. Remove the battery boxes. Refer to
INSTALLING/RE-
MOVING GROUP 24 BATTERY BOXES in PRO-
CEDURE 9 of this manual.
5. Remove the mounting screw and washer that se-
cures the top of the EXISTING shock to the base frame.
6. Remove the mounting screw and locknut that secures
the bottom of the EXISTING shock to the suspension
arm.
7. Remove the EXISTING shock.
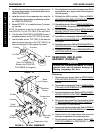
Position
Tie Wrap
B Here
Mounting
Bracket (Only
One (1) Shown
For Clarity)
17. Reinstall the counterweight. Refer to REMOVING/IN-
STALLING COUNTERWEIGHT in this procedure of
the manual.
18. Reinstall the rear shroud. Refer to
REMOVING/IN-
STALLING REAR SHROUD in this procedure of the
manual.
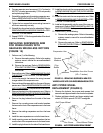
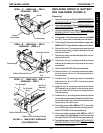
Installing
1. Secure the top of the NEW shock to base frame us-
ing the existing washer and mounting screw. Apply
Loctite 242 and torque to 156-inch pounds.
2. Secure the bottom of the NEW shock to the suspen-
sion arm with the existing mounting screw and lock-
nut. Apply Loctite 242 and torque to 160-inch pounds.
3. Reinstall the battery boxes. Refer to
INSTALLING/RE-
MOVING GROUP 24 BATTERY BOXES in PRO-
CEDURE 9 of this manual.
4. Reinstall the counterweight. Refer to
REMOVING/IN-
STALLING COUNTERWEIGHT in this procedure of
the manual.
5. Reinstall the rear shroud. Refer to
REMOVING/IN-
STALLING REAR SHROUD in this procedure of the
manual.
6. Reinstall the front shroud. Refer to
REMOVING/IN-
STALLING FRONT SHROUD in this procedure of
the manual.
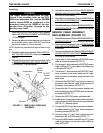
Mounting
Screw
(STEPS 10
and 11)
Washer
(STEP 10
and 11)