


36
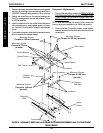
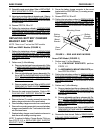
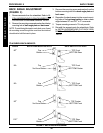
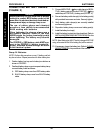
FIGURE 6 - REMOVING/INSTALLING SEAT
STOP SCREWS
Base
Frame
Front Seat Stop Screw
Rear Seat
Stop Screw
Seat Support Bracket
REMOVING/INSTALLING SEAT
STOP SCREWS (FIGURE 6)
NOTE: This procedure is for RWD and MWD wheel-
chairs ONLY.
NOTE: The front seat stop screw should only be removed
if replacing a T-nut for either the seat support bracket or
the battery charger mount bracket. The rear seat stop
screw should never be removed.
1. Unthread seat stop screw from base frame.
WARNING
The seat stop screws must be in place be-
fore operation of your power wheelchair.
Ensure the seat support bracket is posi
tioned between both seat stop screws.
2. When reinstalling the front seat stop screw, ensure
the seat support bracket is located in-between both
seat stop screws. Use loctite 242 and tighten securely.
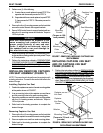
5. Remove the two (2) mounting screws that secure the
battery charger connector to the mount bracket.
6. Remove battery charger connector from mount bracket.
7. Remove the mounting screw which secures the battery
charger mount bracket to the base frame.
8. Replace the battery charger mount bracket and se-
cure it to the base frame with the EXISTING mounting
screw. Securely tighten.
9. Secure the battery charger connector to the mount
bracket with the EXISTING two (2) mounting screws.
Tighten securely.
10. Reverse STEP 3A, 3B or 3C.
11. Perform the instructions outlined in
PREPARATIONS
FOR REMOVING/INSTALLING SEAT FRAME (STAN-
DARD FRAME, ADJUSTABLE FRAME, AND CAP-
TAINS VAN SEAT) in PROCEDURE 6 of this manual.
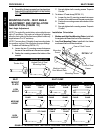
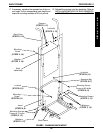
FIGURE 5 - ARROW FWD MODEL
Mounting
Screw
Mounting Screw
Base Frame
Battery
Charger
Mount
Bracket
Battery
Charger
Connector
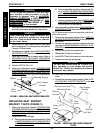
BASE FRAMEPROCEDURE 7
B
A
S
E
F
R
A
M
E