


47
NOTE: If performing the charging procedures independently,
READ and CAREFULLY follow the individual instructions
for each charger (supplied or purchased).
NOTE: If charging instructions are not supplied, consult a
qualified service technician for proper procedures.
Required Items:
TOOL QUANTITY COMMENTS
Battery Charger 1 Supplied
uExtension Cord 1 Not Supplied
u (3-prong plug, 15 ampere current rating; industrial type)
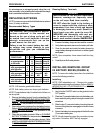
1. Attach the battery charger connector to the charger cable/
battery harness.
NOTE: The battery charger connector is factory installed on
the RIGHT side of the wheelchair. It can be positioned on
either side of the wheelchair for user convenience.
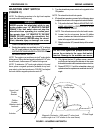
NOTE FOR RECLINERS ONLY: If the wheelchair is a re-
cliner, the battery charger connector as well as the limit switch,
are factory set on the RIGHT side of the wheelchair. How-
ever, they can be positioned on either side for user conve-
nience. The limit switch MUST BE positioned on the same
side as the battery charger connector.
2. Plug the chargers AC power cord, or extension, into the
grounded 120 VAC wall outlet.
3. Wait until charging is complete.
B
A
T
T
E
R
I
E
S
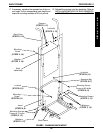
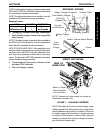
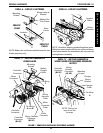
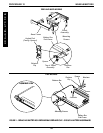
FIGURE 7 - CHARGING BATTERIES
Charger Cable
Base Frame
Battery Charger Mount Bracket
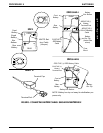
RWD/MWD MODELS
ARROW FWD MODEL
NOTE: Shrouds and drive wheels not shown for
clarification purposes only.
From
Battery
Charger
Battery Charger Connector
From Battery Charger
Three (3)
Pronged Plug
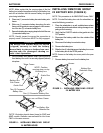
Battery Charger
Battery Boxes
Top View
of Wheelchair
Battery Charger
Mount Bracket
and Connector
REAR OF
WHEELCHAIR
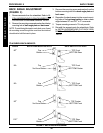
NOTE: Allow eight (8) hours for normal charging. Larger
batteries (greater than 55 ampere-hours) or severely dis-
charged batteries may require up to sixteen (16) hours to
be properly charged and equalized. If charger operates
for sixteen (16) hours and is unable to fully charge the
batteries, an internal timer turns the charger off and be-
gins to fast blink the green light.
PROCEDURE 9BATTERIES