


66
R
E
C
L
I
N
E
R
Adjusting Gas Cylinder
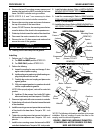
1. To adjust the LEFT gas cylinder: Squeeze the handle
of the RIGHT recliner cable assembly and try to re-
cline the back. The back should not recline.
2. If the LEFT side of the back releases without
squeezing the handle of the LEFT recliner cable
assembly, perform the following steps:
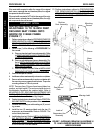
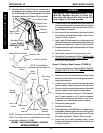
A. Finger tighten the jam nut on the rod of the gas
cylinder until it bottoms out on the rod of the
cylinder (FIGURE 4).
B. Turn the jam nut on the LEFT gas cylinder
COUNTERCLOCKWISE approximately one-
half (1/2) revolution.
NOTE: The gas cylinder rod will turn.
C. Repeat STEP 1.
D. Repeat STEP B until the LEFT side of the back
DOES NOT recline.
3. To adjust the RIGHT gas cylinder: Repeat STEPS
1 and 2 for the LEFT handle of the cable assembly.
CAUTION
Damage to the gas cylinder rod WILL oc-
cur if the following steps are NOT followed
when the jam nut is torqued against the
pivot block.
4. Using NO LARGER than 1/4-inch wide, fine toothed
pliers, wrap masking tape around the teeth of the
pliers two (2) or (3) revolutions.
5. Using NO excessive force, hold the gas cylinder
rod just above the jam nut.
6. While holding the gas cylinder rod and using a 17mm
wrench, turn the jam nut CLOCKWISE and torque
the RIGHT and LEFT jam nuts against the RIGHT
and LEFT pivot blocks to 156-inch pounds.
CHANGING BACK HEIGHT
(FIGURE 5)
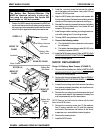
1. Press the push pins on the headrest extension tubes
in and remove headrest extension from back canes.
2. Remove the recliner cables from the back canes.
Refer to
REPLACING RECLINER CABLE ASSEM-
BLIES in this procedure of the manual.
3. Remove the mounting screws, washers and lock-
nuts that secure the TOP of the gas cylinders to the
mounting bracket on the back canes.
4. Remove the mounting screws, washers and lock-
nuts that secure the back canes to the seat frame.
5. Remove the existing recliner back assembly from
the wheelchair.
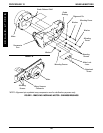
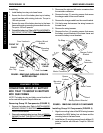
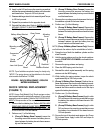
FIGURE 5 - CHANGING BACK HEIGHT
Mounting
Screw
Washers
Locknut
Mounting
Screw
Back Cane
Spreader
Bar
NOTE: Upholstery not shown for clarity.
Headrest
Extension
Tube
Push
Pin
Seat Frame
Mounting
Bracket
PROCEDURE 14 RECLINER
6. Turn the spreader bar on the existing back canes
CLOCKWISE (toward back upholstery) and remove
the spreader bar from the existing back canes.
7. Loosely install the spreader bar onto the NEW back
cane handles by rotating the spreader bar COUN-
TERCLOCKWISE (away from the back canes).
NOTE: If the spreader bar does not thread onto the back
canes, do not force. Turn the spreader bar around and
repeat STEP 7.
8. Line up two (2) bottom mounting holes of back canes
with the two (2) mounting holes in the seat frame.
WARNING
The back canes MUST be fastened se-
curely to the seat frame BEFORE using the
wheelchair. Torque mounting screws to
156-inch pounds.
9. Reinstall the mounting screw, washer and locknut
through the back cane and seat frame mounting holes
and torque to 156-inch pounds.
10. Reinstall the mounting screw through the mounting
bracket of the back cane, nylon washer, mounting
hole in the TOP of the gas cylinder, nylon washer,
mounting bracket and washer and securely tighten
with the existing locknut. Torque to 75-inch pounds.
11. Reinstall the recliner cable assemblies onto the back
canes. Refer to
REPLACING RECLINER CABLES
in this procedure of the manual.