


92
FWD WHEELCHAIRSPROCEDURE 17
F
W
D
W
H
E
E
L
C
H
A
I
R
S
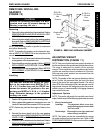
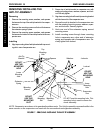
3. Remove the two (2) socket screws that secure the
side shroud bracket to the suspension arm.
4. Remove the mounting screw and washer that se-
cures the REAR of the side shroud to the suspension
arm.
5. Remove the side shroud assembly.
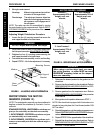
Installing
1. Position the side shroud on the wheelchair frame.
2. Install the two (2) socket screws that secure the side
shroud bracket into the mounting holes of the sus-
pension arm. Securely tighten.
3. Install the mounting screw and washer that secures
the REAR of the side shroud to the suspension arm.
4. Repeat STEPS 1-3 for the opposite side shroud as-
sembly, if necessary.
5. Reinstall the drive wheel from the wheelchair. Refer
to
REMOVING/INSTALLING DRIVE WHEEL in PRO-
CEDURE 12 of this manual.
6. Reinstall the rear shroud. Refer to
REMOVING/IN-
STALLING REAR SHROUD in this procedure of the
manual.
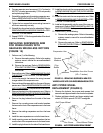
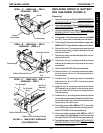
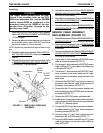
FIGURE 3 - REMOVING/INSTALLING SIDE
SHROUD ASSEMBLY
Socket
Screws
Side Shroud Bracket
Mounting
Screw
Washer
Suspension Arm
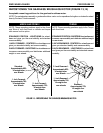
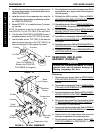
REMOVING/INSTALLING
COUNTERWEIGHT (FIGURE 4)
WARNING
The sensor on the wheelchair should pre-
vent the wheelchair from operating with-
out the counterweight secured to the rear
of the wheelchair. If the wheelchair oper-
ates without the counterweight, DO NOT op-
erate the wheelchair. Have the wheelchair
serviced by a dealer or qualified technician.
The counterweight weighs 42 pounds. Use
proper lifting techniques (lift with your legs)
to avoid injury.
Removing
1. Remove the rear shroud. Refer to
REMOVING/INSTALL-
ING REAR SHROUD in this procedure of the manual.
2. While using proper lifting techniques, use ONE hand
to firmly grasp the handle and the OTHER hand to
firmly grasp the OUTSIDE LOWER EDGE of the
counterweight.
3. Pull the outside lower edge toward you, releasing the
bottom shoulder screws on the counterweight from the
bottom slots in the mounting brackets.
4. Lift the counterweight up and remove the top shoulder
screws from the top slots in the mounting brackets.
Installing
1. While using proper lifting techniques, use ONE hand
to firmly grasp the handle and the OTHER hand to
firmly grasp the OUTSIDE LOWER EDGE of the
counterweight.
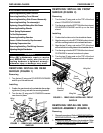
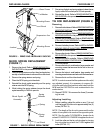
2. Hold the counterweight at an angle (DETAIL C) and
position the top shoulder screws into the top slots on the
mounting brackets.
3. Lower the counterweight down until the bottom shoulder
screws engage in the bottom slots on the mounting brack-
ets.
4. Push in the bottom rear of the counterweight to se-
cure the counterweight to the wheelchair until it locks
into place (DETAIL A).
5. Install the rear shroud. Refer to
REMOVING/INSTALL-
ING REAR SHROUD in this procedure of the manual.
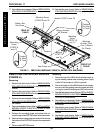
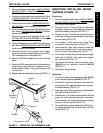
Front
Mounting
Hole
Rear
Mounting
Hole