


SECTION 10—FRONT RIGGINGS
Part No. 1125078 65 At’m and At’m QT
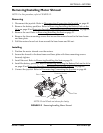
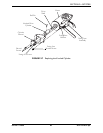
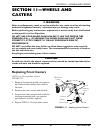
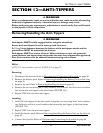
FIGURE 10.1 Installing/Removing the Front Rigging Support Brackets
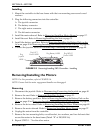
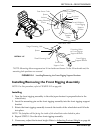
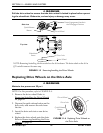
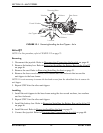
Installing/Removing the Front Rigging Assembly
NOTE: For this procedure, refer to FIGURE 10.2 on page 66.
Installing
1. Turn the front rigging assembly to the side (open footrest is perpendicular to the
wheelchair).
2. Insert the mounting pin on the front rigging assembly into the front rigging support
bracket.
3. Rotate the front rigging assembly towards the inside of the wheelchair until it locks
into place.
NOTE: The footplate will be facing the inside of the wheelchair when locked in place.
4. Repeat STEPS 1-3 for the other front rigging assembly.
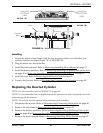
5. If necessary, adjust the footrest height. Refer to Adjusting Footrest Height on page 66.
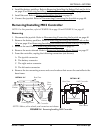
Coved Washers
Spacer
Spacer
Locknut
Locknut
Existing Mounting
Screw
New Mounting
Screw
Spacer
Front Rigging
Support
Bracket
Front Seat
Support
Tube
Seat Frame Tube
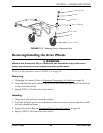
Front Rigging
Support Bracket
Spacer
Front Seat
Support Tube
Seat Frame Tube
*Large Mounting Hole
*Small Mounting Hole
Mounting Holes
on Front Riggings
Support Bracket
DETAIL “A”
*NOTE: Mounting hole arrangement on 16-inch wide seat shown. On the 18-inch wide seat, the
mounting hole positions are reversed.