SECTION 9—MOTORS
Part No. 1125078 61 At’m and At’m QT
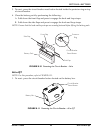
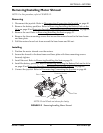
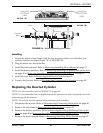
FIGURE 9.6 Removing/Installing the Motors
Installing
1. Secure the motor to base frame with the two mounting bolts, coved bracket, two
washers, and two locknuts (Detail “B” of FIGURE 9.6).
2. Plug the motor into the controller.
3. Install the motor shroud. Refer to Removing/Installing Motor Shroud on page 57.
4. Install the battery pack/box. Refer to Removing/Installing the Battery Pack on the At’m
on page 45 or Removing/Installing the Battery Box on the At’m QT on page 46.
5. Install the seat. Refer to Removing/Installing the Seat on page 31.
6. Connect the joystick. Refer to Disconnecting/Connecting the Joystick on page 40.
Replacing the Knurled Cylinder
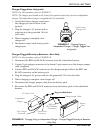
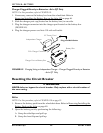
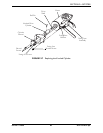
NOTE: For this procedure, refer to FIGURE 9.7 on page 63.
NOTE: It is recommended that two people perform this procedure in order to properly secure the
motor during roll-pin removal.
NOTE: The roll-pin must be replaced when performing this procedure.
1. Disconnect the joystick. Refer to Disconnecting/Connecting the Joystick
on page 40.
2. Remove the seat. Refer to Removing/Installing the Seat
on page 31.
3. Remove the battery pack/box. Refer to Removing/Installing the Battery Pack on the
At’m on page 45 or Removing/Installing the Battery Box on the At’m QT on page 46.
4. Remove the motor shroud. Refer to Removing/Installing Motor Shroud on page 57.
Unplug/Plug
LEFT Motor
HERE
Unplug/Plug
RIGHT Motor
HERE
DETAIL “A”
Mounting
Bolts
Motor
Coved Bracket
Washers
Locknuts
DETAIL “B”


