


SECTION 6—ARMS
Part No. 1125078 37 At’m and At’m QT
SECTION 6—ARMS
ƽ WARNING
After any adjustments, repair or service and before use, make sure that all attaching
hardware is tightened securely - otherwise injury or damage may result.
Before performing any maintenance, adjustment or service verify that on/off switch
on the joystick is in the off position.
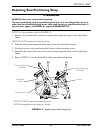
Removing/Installing Arm Pads
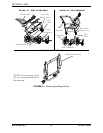
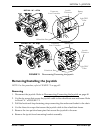
NOTE: For this procedure, refer to FIGURE 6.1 on page 38.
Removing
1. Disconnect the joystick. Refer to Disconnecting/Connecting the Joystick on page 40.
2. Remove the two mounting bolts, four nylon washers, two locknuts and steel washers
that secure the arm bracket to the front and rear seat tubes (Detail “A”).
3. Lift up arm tube.
4. Under the arm tube, remove the two mounting screws and washers that secure the
arm pad to the arm tube and arm bracket (Detail “B”).
5. Repeat STEPS 2 to 4 for the other arm pad.
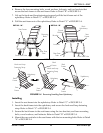
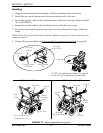
Installing
1. Secure the arm pad and arm bracket to the arm tube using two mounting screws and
washers (Detail “B”).
2. Align the arm bracket with the front and rear seat tubes.
3. Secure the arm bracket to the front and rear seat tubes with the two mounting bolts,
four nylon washers, two locknuts and steel washers (Detail “A”).
4. Repeat STEPS 1 to 3 for other arm pad.
5. Connect the joystick. Refer to Disconnecting/Connecting the Joystick on page 40.