


SECTION 5—SEAT
Part No. 1125078 31 At’m and At’m QT
SECTION 5—SEAT
ƽ WARNING
After any adjustments, repair or service and before use, make sure that all attaching
hardware is tightened securely - otherwise injury or damage may result.
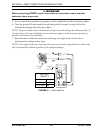
Before performing any maintenance, adjustment or service verify that on/off switch
on the joystick is in the off position.
Removing/Installing the Seat
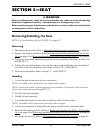
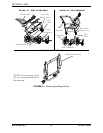
NOTE: For this procedure, refer to FIGURE 5.1 on page 32.
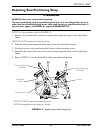
Removing
1. Disconnect the joystick. Refer to Disconnecting/Connecting the Joystick on page 40.
2. Remove the battery pack/box. Refer to Removing/Installing the Battery Pack on the
At’m on page 45 or Removing/Installing the Battery Box on the At’m QT on page 46.
3. Pull up the front latch release loop and tilt the seat assembly back. Refer to Detail “A”
of FIGURE 5.1.
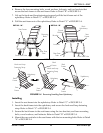
4. Pull up the rear latch release cord with the other hand and lift the seat assembly off
and away from the wheelchair base. Refer to Detail “B” of FIGURE 5.1.
5. Fold the seat assembly. Refer to Detail “C” of FIGURE 5.1.
Installing
1. Lower the rear latches onto the rear crossbrace.
NOTE: An audible click is heard as the rear latches lock into place.
NOTE: Ensure both latches sit flush against the rear crossbrace. If not flush, lift the rear latch
release cord, remove the seat and repeat STEP 1.
2. Tilt back the seat assembly.
3. Unfold the seat assembly.
4. Lower the front latch onto the front crossbrace until it locks in place.
NOTE: An audible click is heard as the front latch locks into place.
5. Lift the seat assembly to ensure that the seat is secured to the wheelchair base.
6. Reinstall the battery pack/box. Refer to Removing/Installing the Battery Pack on the
At’m on page 45 or Removing/Installing the Battery Box on the At’m QT on page 46.
7. Reconnect the joystick. Refer to Disconnecting/Connecting the Joystick
on page 40.